

Whether you’re changing themes, switching domains, or moving servers, a website relaunch is a critical time for your online business.
You’re relaunching to improve your search traffic and conversions…
…but with so many moving parts, there’s a lot that could go wrong.
Don’t worry!
That’s why we’ve created this website relaunch and migration SEO checklist. And we’ve covered all the bases to make sure you’ll — not only maintain your rankings — but will be well set for a big boost in organic traffic.
Let’s dive in.
Why do you need a website relaunch checklist?
A website relaunch is a complex process.
This means it’s easy to miss something that might seem fairly small but could be a crucial component in maintaining your rankings.
Not every step in the checklist will apply to your specific relaunch or migration. But we’ve included steps that will apply to each of the following circumstances:
1. Website redesign (change of theme)
A simple theme change is a fairly low-risk migration.
The focus will be on keeping your internal link structure intact, with no drastic changes to navigation.
2. Website migration due to a framework change (new CMS)
This is a high-risk migration.
When moving from one CMS to another, it’s going to be tough to replicate the structure of the old site exactly. But we’ll show you how to keep changes to a minimum.
3. Domain change or website relaunch
This is relatively low risk.
Rebranding is a fairly routine procedure and something that Google expects. Rankings may fluctuate for a period, but should quickly stabilize.
4. Server migration (changing of hosting)
This type of migration generally involves minimal risk. However, keep in mind that you must create a complete and accurate copy of your existing site on the new server. For projects that are growing, expect traffic spikes, or need more control over performance, a move to a more scalable hosting solution such as a VPS from Hostinger can be especially beneficial.
5. SEO strategy relaunch (planning to jumpstart SEO efforts)
The fact that you will be performing a re-architecture of the information on the site would typically make this a high-risk move. But we’re going to class this as an opportunity.
After all, if you’re relaunching a site for SEO, it probably means your current structure has problems that need to be fixed. And fixing those problems should boost your rankings!
Preparing for the relaunch
Before we start on the checklist, there are a couple of steps we recommend you take.
Firstly, conducting an audit of your existing site, and secondly creating a test (or staging) site to work on during the migration.
1. Crawl and audit your existing site
One of the reasons for a relaunch is to fix old “problems”.
So before pressing on with your relaunch/migration, you’ll want to identify all the issues holding back your current site’s SEO.
You can use Seobility to perform a full on-page audit of your site, so sign up and create a project.
Note: while you’ll be able to run an audit of your site in the free (Basic) version, you won’t be able to export your backlinks. So to follow all the steps in this guide, we suggest signing up for a free 14-day Premium trial.

We’ll be using Seobility in several of the steps in the checklist. And while we may be biased, you’ll soon see why we recommend signing up 🙂
Check out our detailed guide to auditing your website here.
2. Set up a test/staging site
We recommend setting up a test/staging site to work on during the migration.
That way you can tweak, test (and break things!) without affecting the live site.
Test site ready? Let’s jump into the migration checklist.
Pre-Launch Preparation Checklist
Before you start moving content, there are a number of steps we recommend you take.
1. Password-protect the staging site
For the time being, you’ll need to keep crawlers away from your staging site. If not, those pesky search engine bots will end up indexing it….
…which will do a world of damage to your rankings.
Fortunately it’s easy to block them by password-protecting your staging site.
Although there are other ways of preventing crawlers from accessing the staging site – like disallowing bots in the robots.txt file – it’s far from ideal.
Not only can Google still show the disallowed staging site URLS in the SERPs, but there’s no telling which person or bot might end up finding your staging site if it’s not password protected. Therefore, password-protecting your domain is the way to go!
And here’s something cool:
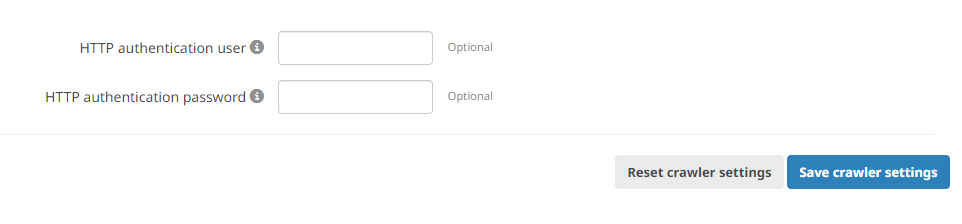
You can add the username and password in Seobility’s crawler settings (Dashboard > Your Project > Crawler settings). This will let our crawler through the gates, and allow you to perform audits on the staging site.
The simplest way to password-protect your site is through .htaccess. Add the following command to the file.
#Protect Directory
AuthName "Dialog prompt"
AuthType Basic
AuthUserFile /home/username/website/.htpasswd
Require valid-user
Then create a .htpasswd file in the directory specified in the AuthUserFile location above with the username and password for accessing the site. Here’s the format:
user:password
stagingsiteuser:stayawayG00gle!
2. Create a spreadsheet with a map of current content
Do you know exactly what content is on your site? Every single page? Me neither.
But to nail your migration… you’ll need to.
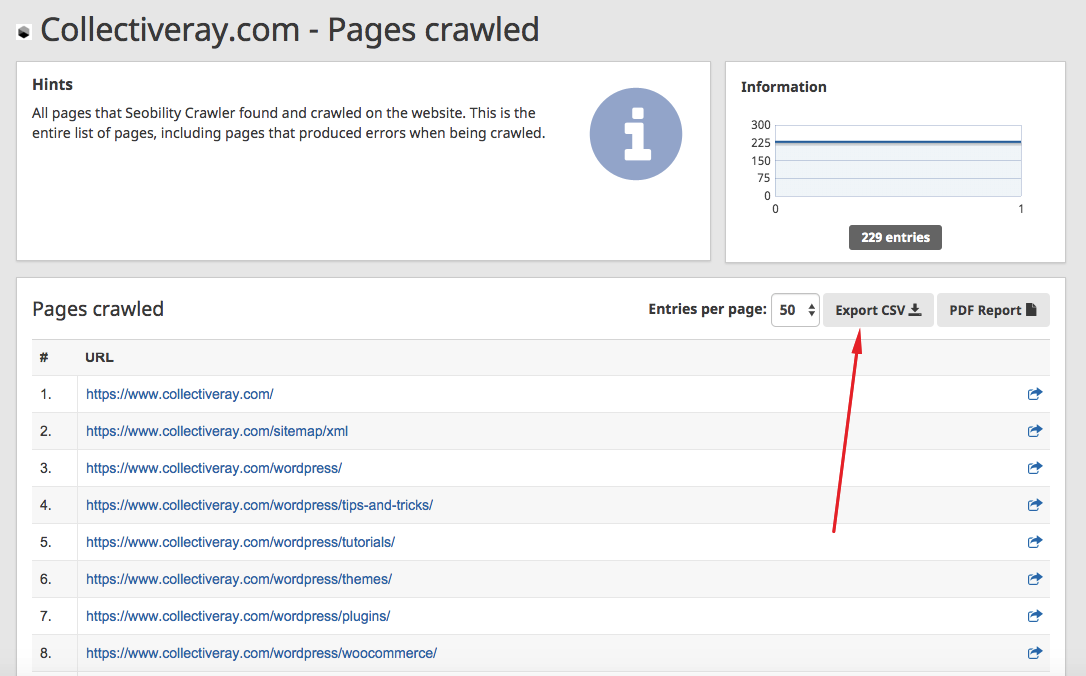
Fortunately grabbing a full list of your site’s content is easy with Seobility. Simply sign up for a free 14-day trial, add your website as a project, and run a crawl.
Once the crawl is complete, go to Dashboard > Website > Onpage > Tech and Meta and you’ll find a full listing of pages crawled under Crawling Statistics.
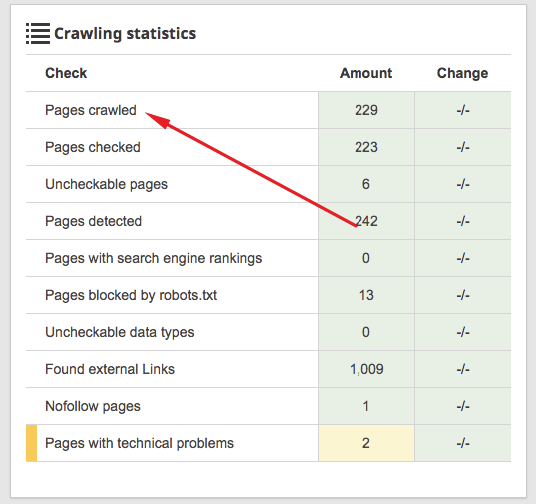
Click on Pages Crawled and you’ll be able to export all of the content URLs on your current site.
Take these pages and put them in a Spreadsheet. We’ll be using this as a base for making some decisions shortly.
Note: we’ve created a spreadsheet template that you can use for data collection. Click here to import it into your Google account.
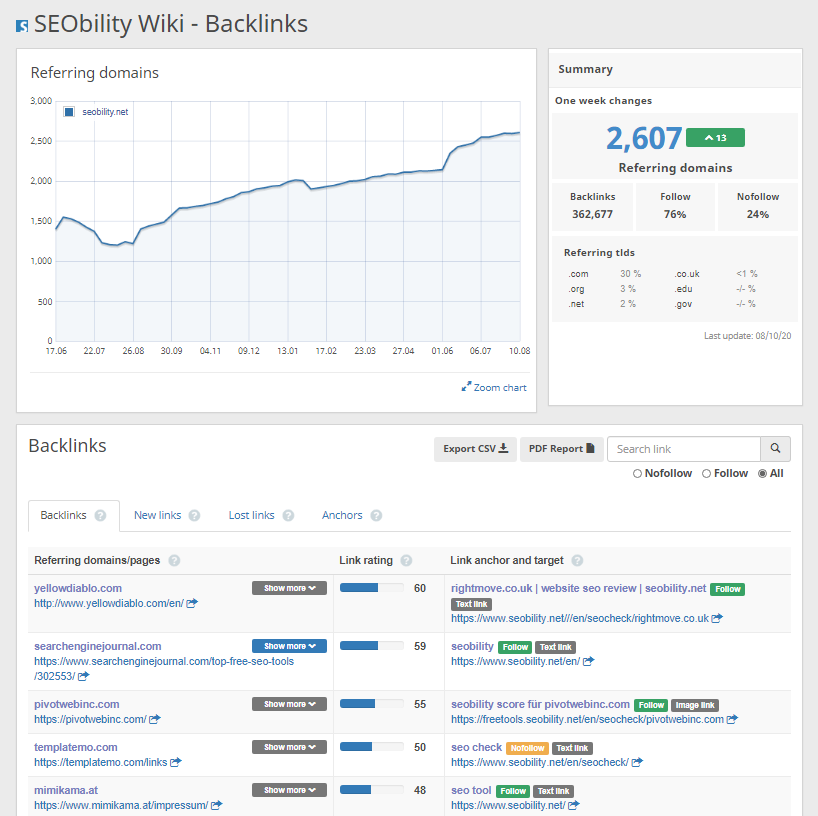
3. Create a map of external backlinks
Once again we can use Seobility to get a list of all the backlinks to our website.
We’ve already created a project for our site. So all we need to do is export the list of backlinks discovered by the tool.
We’ll be using this list to help us make decisions on content.
Go to the Backlinks tab in the Dashboard and export the list.
4. Create a map of internal backlinks
Internal links are super important for on-site optimization. A solid internal link structure helps the search engine bots:
- crawl your site effectively
- understand the relationship between pages
So we want to make sure we don’t make any unwanted changes to our internal link structure during the migration.
And it’s not just links from within content that are important:
Navigational links are critical too. They help Google understand the structure of your site, and power up your content hubs and categories.
Try to maintain navigational links as much as possible during a migration. Big changes could result in important pages losing their strength, and a drop in traffic.
5. Create a map of content with traffic
Steps 3 and 4 dealt with links. But we also need to know which pages on our site are currently receiving the most traffic.
Why? Because we’ll want to take extra care with those pages to ensure we don’t change anything that could cause their rankings to dip.
If it ain’t broke, don’t fix it!
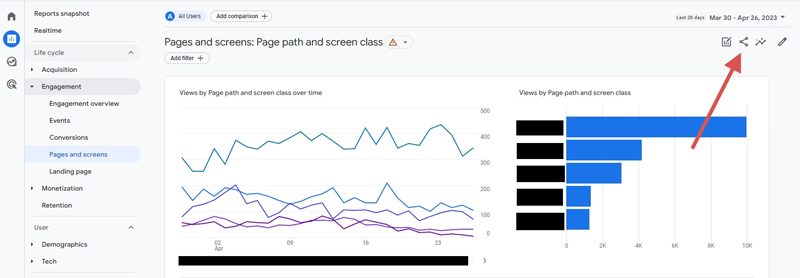
We can use Google Analytics to export a traffic report for all pages on our site.
For the purpose of the migration, we’ll want to see traffic from all sources, not just search.
Assuming you’re using GA4, you can use the pages & screens report (Life cycle > Engagement > Pages & screens) or the landing page report (Life cycle > Engagement > Landing page). You can click on “share this report” on the top left and click on “Download” to export the data.
If you’re still on the old version of Google Analytics, go to Google Analytics > Behaviour > Site Content > All Pages and Export.
6. Perform a content pruning exercise
We now have a full list of our site’s content, including which pages have links, and which are getting traffic. It’s time to make some decisions.
This is your opportunity to “clean house”.
So what’s the plan?
Well, over time websites can get a little bloated. And if your site has been around for a while, there’s a good chance that you might have multiple pages targeting the same keywords (more on that in step 7), orphaned pages or pages that are outdated.
Here are the questions you should be asking first:
- Does the page get traffic?
- Does the page have any backlinks?
If the answer to these questions is no then that page will be a candidate to either:
- Delete
- Merge with another page
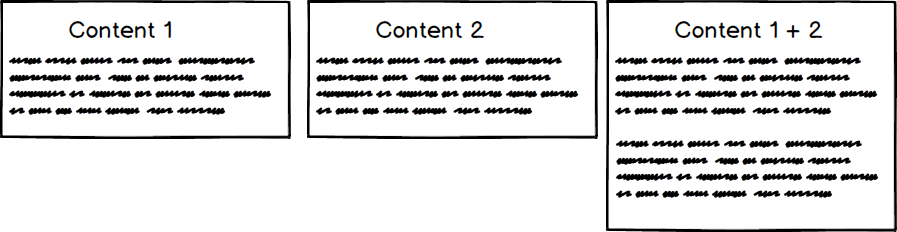
However, even if the page has backlinks you still might want to consider merging (i.e. redirecting) the page.
Why? Because if you have 4 pages covering the same topic — and each has backlinks — merging them into one page will consolidate the link equity and result in a more powerful page.
I should also point out that just because a page doesn’t receive traffic doesn’t mean it’s not a “good” page. Deletion isn’t always the answer. Sometimes you might decide that you can improve/update a page instead, or that it just needs more links (internal or external) to rank.
So you’ll want to review each page before making the decision.
Bottom line: if a page is low-quality, doesn’t rank, and has no links, it should probably go.
7. Make sure you focus on one topic per page (keyword) to avoid keyword cannibalization
I mentioned above that your content audit may uncover multiple pages targeting the same keyword.
When this happens, these pages can suffer from “keyword cannibalization“.
You’re trying to rank for the same keyword on multiple pages. And Google ain’t going to let that happen.
They’ll have trouble deciding which page to rank. And in the worst case scenario, it may be the case that NONE of the pages rank.
So how should you deal with keyword cannibalization?
Our advice:
- Decide which page is the best fit for the keyword (this becomes the primary page)
- Merge any information that’s in additional pages into the primary page
- 301 redirect the additional pages to the primary page
8. Perform a URL optimization exercise (no double keywords, no stop words, no full “titles” in slug)
This is another step that should be handled with care.
Changing the URL of a page has potential upsides, but there are risks too.
URLs should ideally be short, keyword focused and skip words you’re not trying to rank for.
/keyword1-keyword2-keyword3
Something like the following is perfect:
![]()
Yet, this is something that most of us learn as we start investing more time and energy in SEO.
So often we’ll have legacy “messy” URLs because we might not have planned the structure correctly, or were unaware of the SEO implications.
WordPress, for example, simply creates a slug from all of the words in the title. This means that if we don’t manually change the slug, most of our URLs are going to look something like this…
/how-I-manage-to-rank-for-keyword1-keyword2-and-keyword3-without-even-trying
Yikes!
The URL is an on-page ranking signal. Which means that optimizing it is a worthwhile exercise.
But…
As with all major(ish) changes, Google can be a little temperamental. So it’s not without risks.
I’ve made plenty of URL changes over the years and in the vast majority of cases I’ve reaped the benefits. But you’ll find other SEOs who recommend leaving URLs alone unless they are the clear blocking factor.
This means that if a page is already ranking well you should be extra careful. And that advice applies to all steps in this process.
If you do decide to change the URL of a page, make sure to 301 redirect the old URL to the new URL. This will help search engines understand that it’s the same page.
More on this in a moment though…
Further reading: SEO Friendly URLs
9. Check whether some plugin pages have changed
As part of your redesign, you might have decided to change some plugins.
This is important to keep in mind, especially from a user experience point of view.
You need to be very careful not only about your blog posts and pages but about ALL other pages that might have changed.
For example, if you’ve changed your eCommerce plugin, you need to be sure that key URLs (such as /shop, /cart or /checkout have not changed).
If they did? You’ll need to take note of each URL change so you can handle it accordingly.
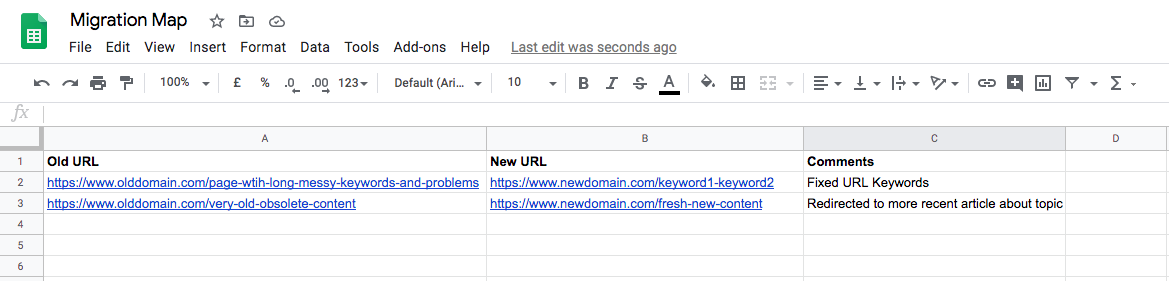
10. Create a map of current URLs to New URLs
Once we’ve worked out which URLs we’re going to change, we need to create a list of 301 redirects.
A 301 redirect indicates to crawlers and browsers that a webpage has moved permanently to a new location.
Once again there are implications with performing 301 redirects.
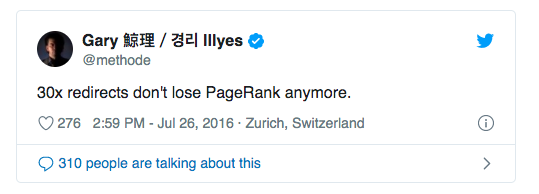
It used to be the case that links passed through a redirect lost some power…
…however Gary Ilyes from Google indicated way back in 2016 that redirects now pass full value.
Chained redirects, however, are still a problem.
Chained redirects typically happen when you have a page URL that has been updated and redirected multiple times.
Link → Old URL → New URL→ Even Newer URL
In such cases you should try to point the old URLs to the new URLs without having an intermediate step, especially for internal URLs.
Why? Because although the 301s pass on a page’s value, every redirect still costs time and resources. Which is bad for crawlers (like Googlebot) and sub-optimal for users.
11. Take note of all SEO plugin settings
Your SEO plugin settings are critically important to the SEO health of your site. You should maintain them across the migration, or make the necessary changes if you are relaunching your website for SEO purposes.
Take screenshots of all current settings so you can replicate them to the letter on the new setup.
12. Take note of all other plugins that might affect SEO or UX
While SEO plugins are extra important, there will be plenty of other plugins that can affect the overall structure of your site.
The settings of all key plugins should be saved as screenshots so that you can compare and ensure that you have moved all settings correctly.
13. Set benchmarks. Take note of key user metrics in Google Analytics (bounce rate, time on site, return rate, demographics, traffic, etc.)
Now that we have most of our content migration map in place, we’ll want to record some benchmark statistics for comparison.
Here’s what we recommend recording:
Time on site: we would expect this to increase if we have improved the overall user experience of the site.
Bounce rate: this is a tricky metric to understand, so I won’t go into too much detail here. A low bounce rate is great, but a high bounce rate is not necessarily a bad thing. Either way, take note of it so that you can compare.
Return rate: this is another good metric to monitor. If the user experience has improved, we would expect users to return more often.
Goals: we want more of our goals to be hit with the new site.
Conversions: not just a key metric, but THE metric that we definitely want to see improve.
Note: these are my suggestions, but every business is unique. So you should decide which metrics are most important to your business and which you aim to improve.
14. Verify the current domain with Google Search Console (GSC)
This is something you should have done already. But if you haven’t…. now is the time to do so!
If we change the actual address of the site (the domain), one of the actions we will perform is a Change of Address instruction in GSC.
So you’ll need to make sure that the existing domain is verified first.
15. Verify the old domain with Bing Webmaster tools
Most of us focus on Google (quite correctly as it drives around 92% of search as of 2023), but Bing can also send a steady stream of traffic with its market share of roughly 3%.
With recent innovations, like an AI chat mode powered by ChatGPT, Bing may even be able to continue capturing market share from Google.
So I’d recommend verifying your domain in Bing’s Webmaster tools.

You have nothing to lose and traffic to gain!
16. Download any Disavow file for the existing domain
If you’ve disavowed any links in the past, you should download a copy of this file, especially if you’re migrating to a new address.
We’ll perform a full 301 redirect of the old site to the new one. So any old toxic links that aren’t disavowed will be inherited by the new domain. This means that any toxic link penalties will also be inherited!
You can use the same disavow file for the new site to avoid any issues.
17. Prepare new server infrastructure
If you are migrating your site to a new infrastructure (i.e. different hosting, or new cloud servers) now is the time to make sure everything is running smoothly.
18. Prepare and install a new SSL certificate
As part of the set-up of the new infrastructure, we’ll need to either:
- migrate our existing SSL certificate, or
- create a new one if the domain has changed
This can be a somewhat lengthy process, particularly if you are using an Organization Validated certificate or Extended Validation certificate. So you should make sure you have prepared all of this beforehand.
Have the certificate ready and installed before you launch.
19. Create a copy of the current sitemap
Once we perform our migration, we’ll need to double-check we have all of the content that existed in the sitemap.xml file.
Even if we’re making changes to the content, we will still want to have a copy of the sitemap.xml.
Why? Because we’ll want to make sure that the new sitemap.xml doesn’t have:
- any extra pages that we don’t need/don’t exist anymore, or
- is missing any pages that should have been included
20. Make a copy of the robots.txt file
As with the sitemap.xml file, the robots.txt file contains important directives which influence how Google and other bots crawl your site.
A misstep in the new robots.txt file could create all sorts of ranking chaos. Even though small errors aren’t always an issue, accidentally blocking pages that shouldn’t be blocked is. Here’s what Google says about robots.txt mistakes on their Search Central blog:
So make sure you keep a copy of the old file for comparison.
Migration Checklist
Preparation done? It’s time to migrate your site!
1. Migrate all important content
Our first step will be to move all the important content from the old site to the new site.
Why do I say “important” content?
Because we should only be migrating the content that we decided to keep during our preparation.
If a page is going to be deleted (or merged) there’s no point importing it to the new site. We’ll just be giving ourselves an extra step.
The content migration process will differ across frameworks. But most CMSs will have plugins or extensions to help you with migration.
Note: particular care needs to be taken with images during migration. If your domain or folder structure has changed, you’ll need to make sure that embedded images are pointing to the correct URL/path.
2. Create an appropriate response for the pages that are going to be removed or merged
Any content that is going to be merged or deleted needs to be handled appropriately.
If a visitor (or search engine) tries to access an old URL, they should be served an appropriate response.
So what is the appropriate response?
Here’s what we recommend:
- For pages that have merged with other pages, you should 301 redirect the old URLs to the primary page.
- Pages that are no longer relevant, but where a page with a very similar topic exists on the site should be 301 redirected to the relevant topic/page.
- If you have a category related to the topic, 301 redirecting the old URL to the parent category is recommended.
- Pages that are no longer valid and where no other similar topic exists should serve a 410 (gone) response. This is better than a 404 as it informs Google that the page won’t be coming back and should be removed from their index.
- Do not redirect broken pages to the homepage – this is a user experience problem and any internal links that are redirected to the homepage will be treated as (soft) 404 errors
3. Create a custom 404 page
Hitting a 404 page is a frustrating experience for users.
A custom 404 page can soften the blow.
Our advice? Explain that the site has been redesigned and some of the content is no longer available. You can also suggest alternative courses of action such as:
- Searching for the specific keywords they hit
- Getting in touch with you
- Visiting relevant sections of the site they might be looking for
A fun 404 visual or message also helps to break the frustration.
4. Be wary of soft 404s
We mentioned above that you should avoid redirecting deleted pages to the homepage.
That’s because Google may choose to treat such redirects as soft 404s. They are expecting a specific piece of content, but instead, they get redirected to a non-relevant page (in this case the home page). And when that happens, instead of link equity being passed over, the link value is lost.
Additionally, redirecting internal links to the homepage is a known spammy tactic. If you do it, your website could be sending negative SEO signals.
5. Optimize your META descriptions
A migration is a great opportunity to fix niggling SEO issues.
So we’d recommend cleaning up (and improving) your meta descriptions as part of your migration process. It’s a worthwhile exercise that can increase your click-through rate from Google.
Head over to our meta description guide to find out how to craft the perfect SEO meta description.
6. Prepare redirects from the old URLs to the new URLs (Redirection plugin or .htaccess)
Did any URLs change in the migration? You’ll need to prepare redirects to maintain your rankings.
You can manage redirects with:
- plugins
- cPanel/your hosting provider
- directly through the .htaccess file of the website.
We prefer to use plugins where possible as they make things easier to implement and track. And easier is always better!
If you’re running WordPress, Redirection is a super simple plugin that helps you manage your 301s.
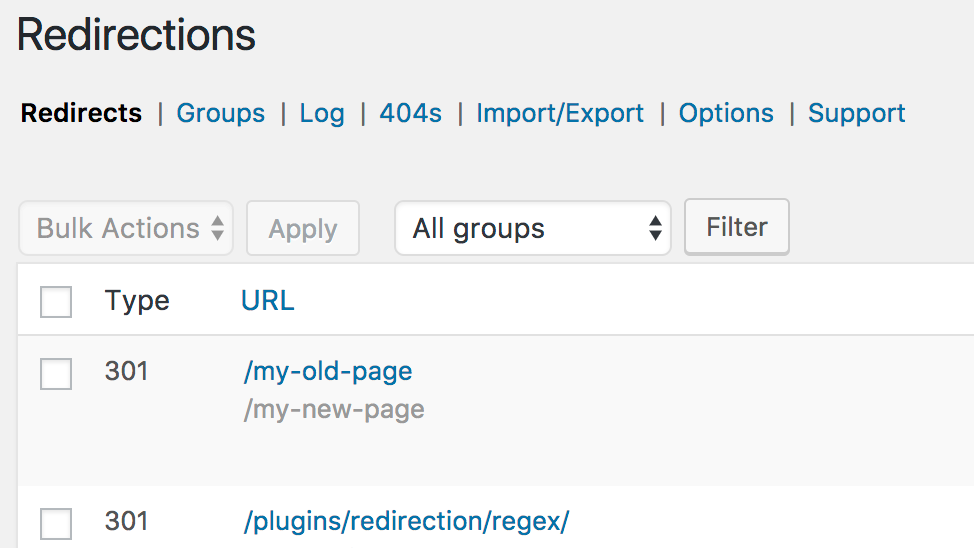
However, if you want to manually edit your .htaccess file here’s how to do it.
7. Audit the (new) test site
With your content and redirects in place, it’s a good time to run an audit of the (new) test site.
Because even when you’re following a checklist like this one, a large migration is likely to throw up a few errors/issues.
You can use Seobility to perform the site audit. And you can override any password protection or crawler blocking with a few clicks…

You’ll find these settings in “Crawler Settings” in the dashboard.
8. Fix the issues discovered by the site audit
We’re sure it goes without saying that you’ll want to fix as many technical SEO issues as you can before going live.
Read our SEO audit guide for details on how to find and fix some of the most common SEO errors. This could be a lengthy step, but it’s one that’s super worthwhile.
9. Update any internal content redirects with updated URLs
Redirects are going to play a major role in our migration. But any time there’s an opportunity to avoid them… we should take that opportunity!
After all, a redirect is an extra “hop” that both crawlers and users need to perform. So it’s better to update links to point directly to the correct page whenever possible.
And we can do just that with internal links.
In Seobility, you can find Redirects to fix under OnPage > Structure > Redirects in the Links section.

10. Resolve any broken link migration issues (broken links, broken images)
If you deleted content and forgot to remove (or redirect) any internal links, you’ll create an internal broken link.
And that’s not good.
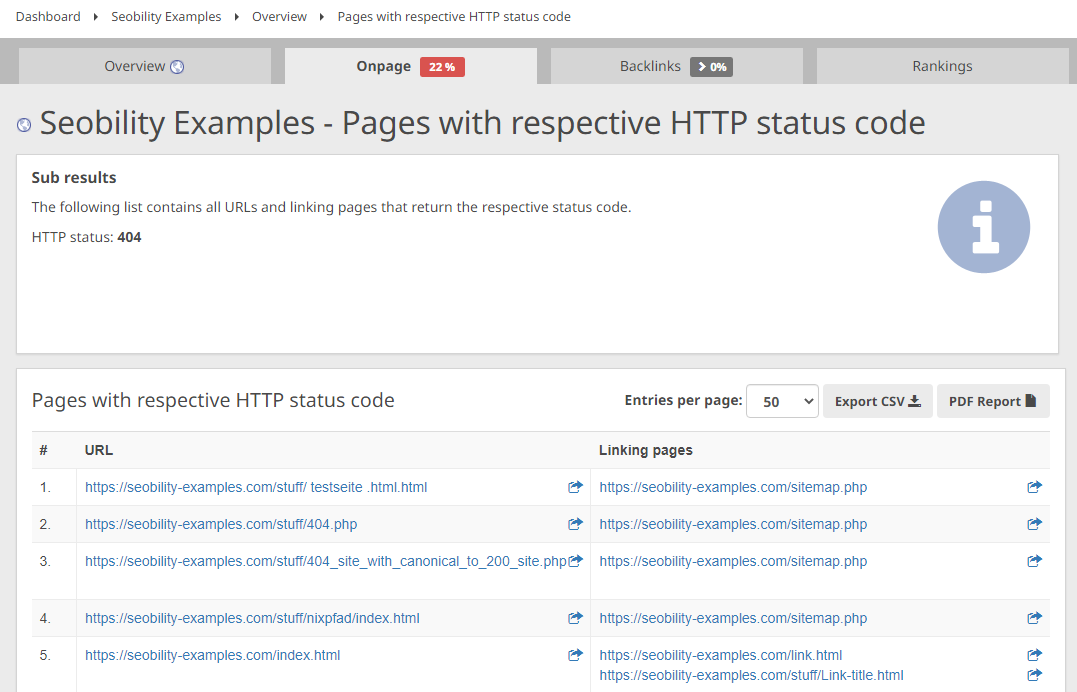
Check the HTTP-Status Overview panel on your Seobility “Tech. & Meta” page for 404 errors.

In the example above we can see there are 19 pages currently returning a 404. So any internal links to those pages will need to be updated.
Click on the number next to “404” to view all the pages returning 404s (on the left), and the pages that link to them (on the right).
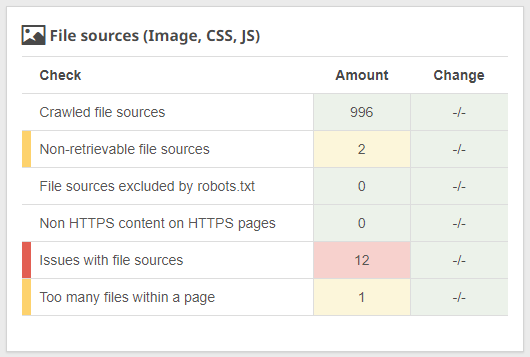
Broken images and scripts will show up on the File Sources panel (“Non-retrievable file sources”).
11. Remove any “extra” pages from the new template
It’s worth double-checking that the migration didn’t create any “extra” pages.
For example, you might have forgotten to delete demo content after setting up a new theme. It happens…
You can browse a full list of pages discovered during Seobility’s crawl by clicking on “Pages Crawled” under “Crawling Statistics” (Tech. & Meta).

Look out for any pages you weren’t expecting.
As an additional check, the “Text Quality” panel of Seobility’s content audit will highlight pages that include filler text…
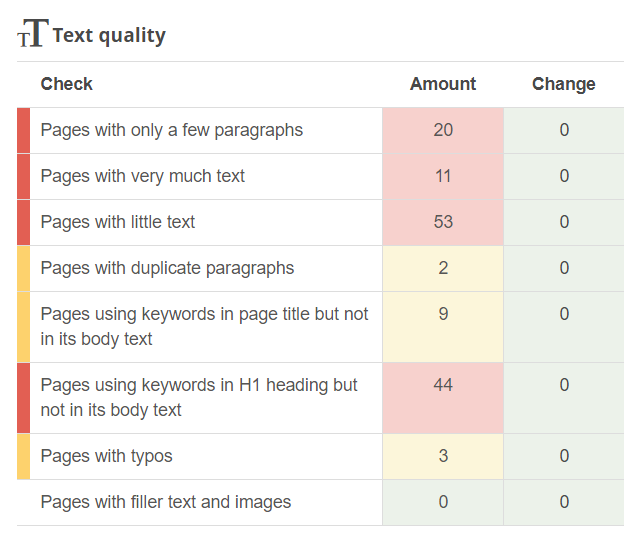
…there’s a good chance that some of these pages are junk.
12. Create a new robots.txt file
Content wise, we should be pretty much set now. But there are still a number of steps we need to run through before we’re ready to go live.
First up, we’ll want to set up our robots.txt file.
If you haven’t changed platforms, that’s probably just going to be a case of copying your existing file to the new site. But it’s still worth double-checking the file to make sure everything looks correct.
13. Create a new sitemap
It’s time to create a new sitemap.
We’ll be comparing this against the old one to look out for any obvious errors. And we’ll also want to make sure that any content we chose not to migrate (whether redirected or deleted) is not included on the sitemap.
Watch out for additional taxonomies that were not present in the old version. And if you spot any, then make sure you’ve set up your SEO plugin correctly.
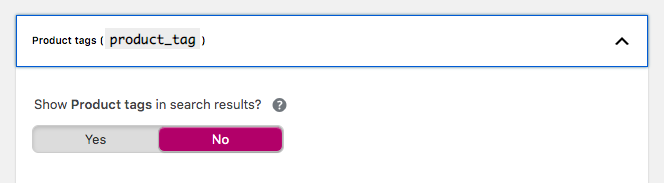
For example, WooCommerce tends to create a large number of entries in the sitemap (colors, sizes, brands, and other product attributes).
These are all thin pages that add no value to the end user. And too many of these pages could result in your site being downgraded by Google.
In YOAST’s SEO plugin, you’ll want to set the value to “No” for any taxonomies you want to exclude from search.
14. Ensure images are not creating their own URL
One particularly annoying SEO gotcha in WordPress is that (if not configured correctly) image URLs can be accessible on their own page.
This can result in hundreds (or even thousands) of thin pages that contain only an image.
That’s a ton of thin content and a major SEO issue.
The fix? Ensure that all image pages are not indexable and redirect to the actual image. It’s easy to do in YOAST.
Click the switch to ‘Yes’ to automatically redirect the attachment URLs to the image itself.
15. Check that canonical tags are correct
Many CMSs create different ways to access the same content. Tags, categories, pagination, filters, and other parameters can be particularly troublesome.
These days Google will do a decent job of guessing the correct URL. But we don’t want to leave anything to chance…
…so you should make sure each page has a canonical tag pointing to the definitive version.
Seobility checks for canonical link problems in the OnPage > Structure report under Canonical link errors.
16. Compare internal linking
This is SUPER important
As we previously mentioned, internal links are how Google crawls your site and perceives its structure.
So we don’t want any drastic changes to the following:
Navigation – pages that we want to rank such as product and service pages that have direct links, or links from 1st level pages should keep them.
Category pages – some themes create automatic internal links to category pages through breadcrumbs or other methods. Make sure the new theme is maintaining these links, otherwise, you’ll lose a significant amount of power going to posts/pages. On the flip side, if your new theme creates these links and they weren’t in place before, you might want to adjust your settings to remove them.
Content links – we should maintain as many of these as we can. A migration is not the ideal time to change links within posts.
17. Add Schema Data to NAP, Content, and anything else that is relevant
Schema helps machines (in our case search engines) understand content by presenting information in a structured format.
And Google also uses schema to display rich snippets in the search results. Which helps us grab more clicks!
So whenever possible, we want to include it.
As a minimum, you should include Organization structured data with your NAP (Name, Address, Phone numbers).
But products, reviews, recipes, events, articles, authors, and more all have their own schema markup you can include on a page.
SEOPress is a cool plugin that helps you manage your site’s schema (check out my review here).
For more on schema and rich snippets check out our detailed rich snippets guide.
18. Make sure you have all important legal pages in place
Legal pages give legitimacy to your site and help with trust. So make sure you have all of the necessary pages in place.
These include…
- Privacy Policy
- Terms and Conditions
- Cookie Policy
- GDPR compliance information
- FTC Affiliate Disclosure
…and any other pages required within your niche.
19. Verify Contact forms and other forms work correctly
Verify that contact forms and other user inputs work correctly. A shiny new website isn’t much use if you’re not receiving enquiries or sign-ups!
20. Check your About Us page and make sure it is as comprehensive or better than the old version
Your site’s “About Us” page is important for building trust with search engines and users.
Our advice? Make your about page as detailed as possible and include physical locations and photos of people working in the business whenever possible.
And we also recommend including social media links for both the site and its authors/team.
All these convey a sense of trust, both to users and to search engines. For more information on why this is so important, check out our post on E-E-A-T.
21. Add Google Analytics, AdWords, Google Tag Manager, Facebook Pixel and any other 3rd party scripts
Our migration is almost complete. But the last thing we’ll want to do is add any required third-party scripts, such as Google Analytics.
Just be aware that each script will have an impact on load time. So add only the absolute necessary scripts required for running your site and collecting the data you need.
Launch Checklist
With our migration complete, it’s time to launch!
We recommend scheduling your launch for off-peak periods. This will give you time to iron out any issues before peak load hits.
Here are the steps…
1. Remove password protection, or noindex/disallow directives
Now that you’re ready to launch, you can disable any methods in place to discourage or stop search engines from visiting your site.
Make sure to double-check this. You definitely don’t want to launch with crawlers unable to visit!
As a starting point, make sure the “Discourage search engines” checkbox is unticked if you’re using WordPress.
You can find it under Settings > Reading

2. Update nameservers if you are moving server hosting
If you’re moving to a new domain or changing hosting, it’s time to hit the “switch” and launch to the world.
You’ll need to update the DNS settings or nameservers of the domain to point to the new server
Note: you might need to wait a few hours for the DNS change to fully propagate before you start seeing the new version of the site.
If you’re keeping the same hosting (but in a different directory), you’ll just need to change the directory attached to the domain.
Or if you’ve been working on a staging site, your hosting might have an option to push it live. If in doubt, ask your host for support!
3. Set up full redirect in .htaccess or as necessary
Switched to a new domain? You’ll need to set up redirects to point visitors (and crawlers) to the new address.
Here’s how to do that at the domain level using .htaccess.
RewriteEngine on
RewriteCond %{HTTP_HOST} ^www.oldsite.com$
RewriteRule (.*)$ https://www.newsite.com/$1 [R=301,L]

RewriteCond %{HTTP_HOST} ^oldsite.com [NC]
RewriteRule (.*)$ https://www.newsite.com/$1 [R=301,L]
The above redirects https://, https://, https://www and https://www.oldsite.com to https://www.newsite.com
Individual URLs will also be correctly redirected.
4. Make sure the old site is no longer accessible to search engines
At this point, we need to make sure that the old site is no longer accessible to search engines.
Any requests to the old domain should 301 redirect as explained above, otherwise we’ll end up with duplicate content issues. Which we definitely don’t want.
Look out for rogue subdomains (oldsite.domain.com) and subdirectories (domain.com/oldsite). These should also redirect.
5. Perform a thorough visual inspection
Now that the new site is live, run through it with a fine tooth comb, page-by-page, and make sure everything looks correct.
You’ll also want to double-check URLs are being displayed as expected.
6. Test Redirects
As we’ve highlighted, redirects are a critical part of the migration. So you’ll want to triple-check that everything is working as it should be.
We recommend testing the following:
- Check whether internal redirects are working correctly (i.e. if you moved /contact-us.html to /contact-us make sure that the redirect is sending the user to the final desired URL)
- Check whether redirects from the old domain to the new domain are working correctly. www.oldsite.com/page-1 should now be sending you to www.newsite.com/page-1
- Check redirected internal links from the old site. For pages that have changed their address, confirm that the old URL on the old site takes you to the new URL on the new site. For example, www.oldsite.com/contact-us.html should send you to www.newsite.com/contact-us
- Check http to https redirects are working correctly. https://www.oldsite.com/contact-us.html should send you to https://www.newsite.com/contact-us
7. Check several backlinks and verify that they are redirecting to new content as per your map
Another key reason for making sure all our 301 redirects are in place? Backlinks.
To preserve link equity and link traffic, we need to make sure that all links pointing to our old site are redirecting to the new URLs.
Run through the backlinks report for your site in Seobility, and check several links to make sure they are redirecting to the correct page.
If you find a link that doesn’t redirect (or you get a 404 error) you’ll need to retrace your steps to figure out what went wrong.
It’s critical that we don’t lose any links!
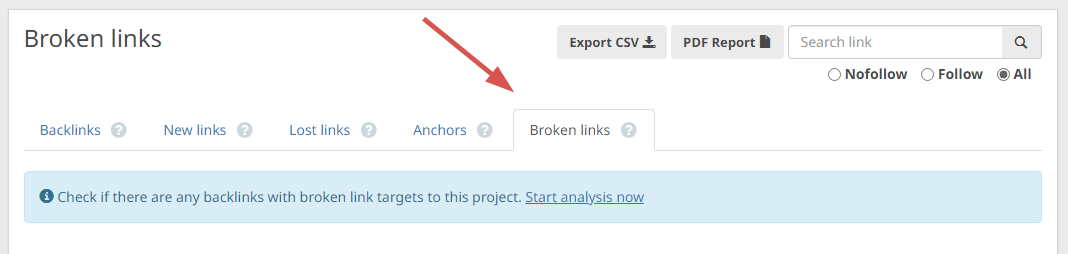
Tip: You can use the “Broken links” tab in the backlinks list in Seobility to check if the new site has any broken backlinks. This will help you discover any broken links you might have missed.
8. Run a site:olddomain.com query, click on a few URLs, and verify that you are being redirected to the new page
Perform a site:www.olddomain.com query on Google. While not exhaustive, this will list a good chunk of the URLs Google has indexed for your old site.
Click a few of these results to confirm that you are fully redirected to the appropriate page.
If you’re not getting redirected, you’ll need to fix this asap. Otherwise you’ll lose rankings and traffic.
9. Add your new site to Google Search Console
Once you’re happy with your redirects, it’s time to submit the new site to Google Search Console.
Verify the new domain on Google Search console by completing one of the verification methods detailed here.
10. Add your new site to Bing Webmaster tools
Verify the new site on Bing Webmaster tools. We know, we know… but again it does drive some traffic!
11. Test your Robots.txt file with the Google Robots Testing tool
Make sure that your content can be accessed by verifying the site using Google’s Robots Testing tool.
Try to access some important URLs and URL patterns to make sure that Google is allowed to crawl them.

Note: The robots.txt testing tool only works with URL-prefix properties, but not with Domain properties. If the link doesn’t work for you, you can use this free tool as an alternative.
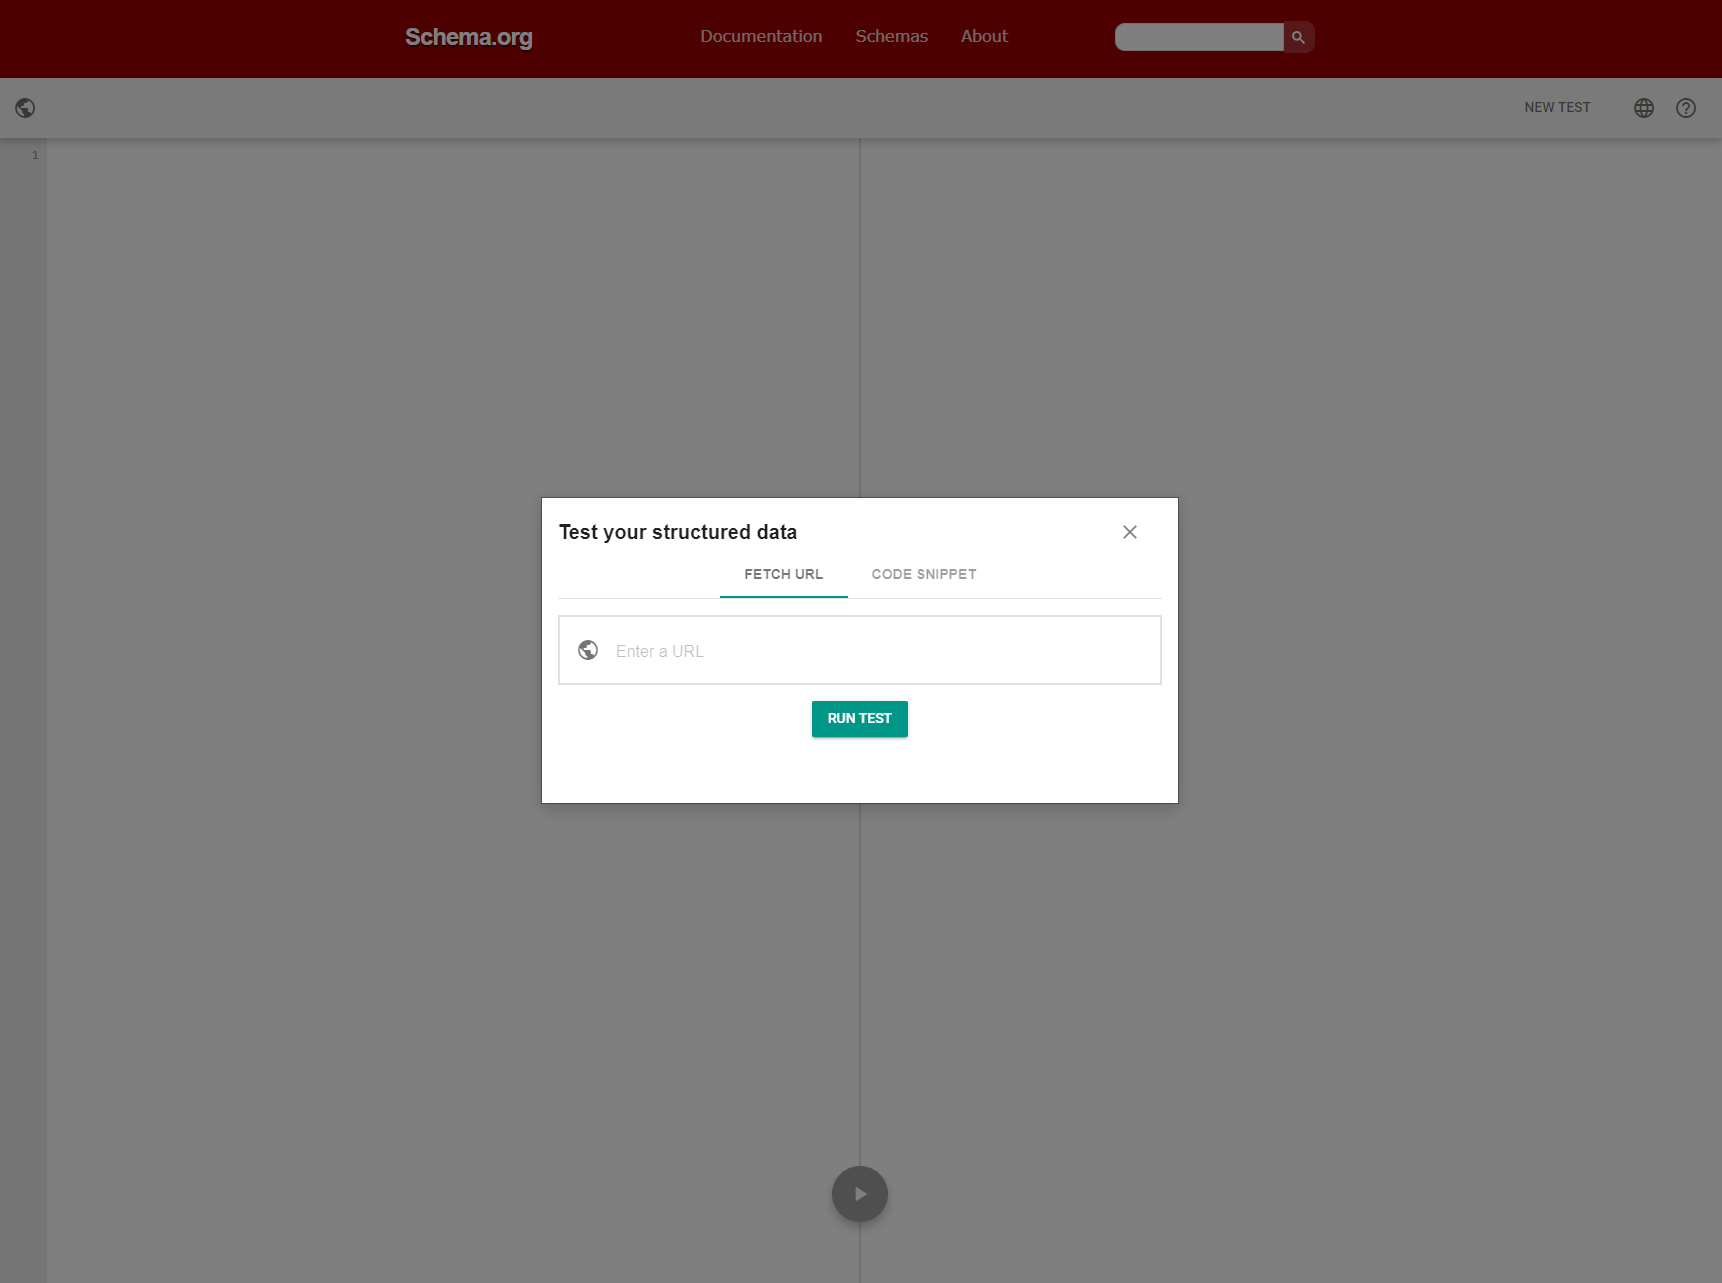
12. Test Your Site for Correct Structured Data and Fix Errors
As part of our migration checklist we worked on structured data (schema).
So now we’re live, we’ll want to test to make sure there are no errors in our schema code.
You can use Google’s Schema Markup Validator and their Rich Results Test to check your schema.
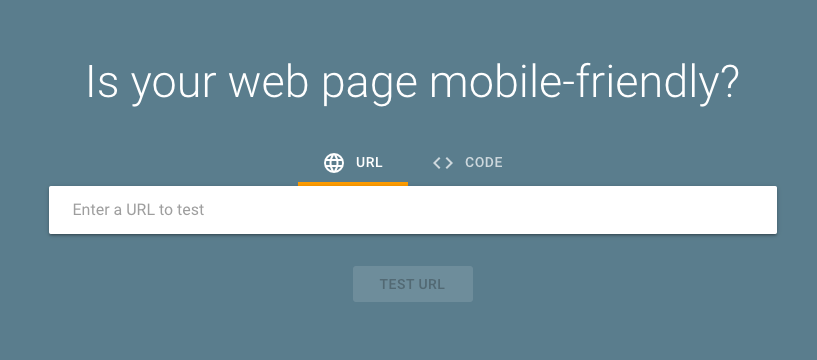
13. Check that the new site is mobile friendly
A mobile-friendly website is a must.
While your new site will hopefully have a responsive design, it’s worth running it through Google’s Mobile-Friendly Test in case any individual elements on the page are causing issues on mobile.
14. Submit new Sitemap
If everything’s looking good, we’re ready to tell Google to start crawling our new site.
Submit the new sitemap.xml URL on the new domain in Search Console, and make sure there are no errors after submission.
Do the same for Bing Webmaster tools.
15. Add Disavow file to the new property
If you had a disavow file for your old site, now is the time to upload it into the new property on Search Console.
Otherwise, you’ll no longer be disavowing those toxic links… and they could have a negative impact on your rankings!
16. Perform a Request Index
Google should find your new site pretty quickly, as when it recrawls the old one it will pick up on the redirects.
But you can speed up the process by asking Google to recrawl the old domain (so they see the 301) and then asking it to crawl the new domain.
This can be done using the URL inspection tool in Search Console (for a small number of URLs) or by submitting the new sitemap.
17. Perform a change of address exercise
Another way to speed up the process of Google switching domains is to use the Change of Address tool in Search Console.
Note: you’ll need to have your redirects in place first for this to work.
18. Add a warning/info message that your site has moved and may contain glitches
As a courtesy to your users, you might want to put up a short message letting them know that your site has recently migrated.
Here’s why:
- If the redesign is drastic, users might get confused and need a bit of guidance
- With a large site, there’s a chance you may have missed something (you’re only human). You can crowd-source help by asking users to report any problems they encounter
19. Update social media URLs
Now that your new site is live, you’ll want to update any links that you have access to.
Social Media would be the first port of call.
But if you have access to other links (for example forum profiles) you’ll want to change them too.
The more external signals Google encounters that the new domain is replacing the old one, the stronger the sign that this site has moved to a new location.
20. Launch any rebranded social media visuals
If the migration was part of a rebrand, you should also update any social media or external visuals to reflect the new branding.
This will keep messaging consistent across all channels.
Don’t forget to update your emails/newsletters, etc.
If you have drip marketing campaigns that are not typically seen by internal users, these might be forgotten. So ensure you go through all your marketing platforms and update accordingly!
21. Check Pagespeed Insights or Lighthouse Audit
It is a good idea to check that your PageSpeed Insights metrics or Lighthouse Audit in the Chrome Dev Tools look healthy.
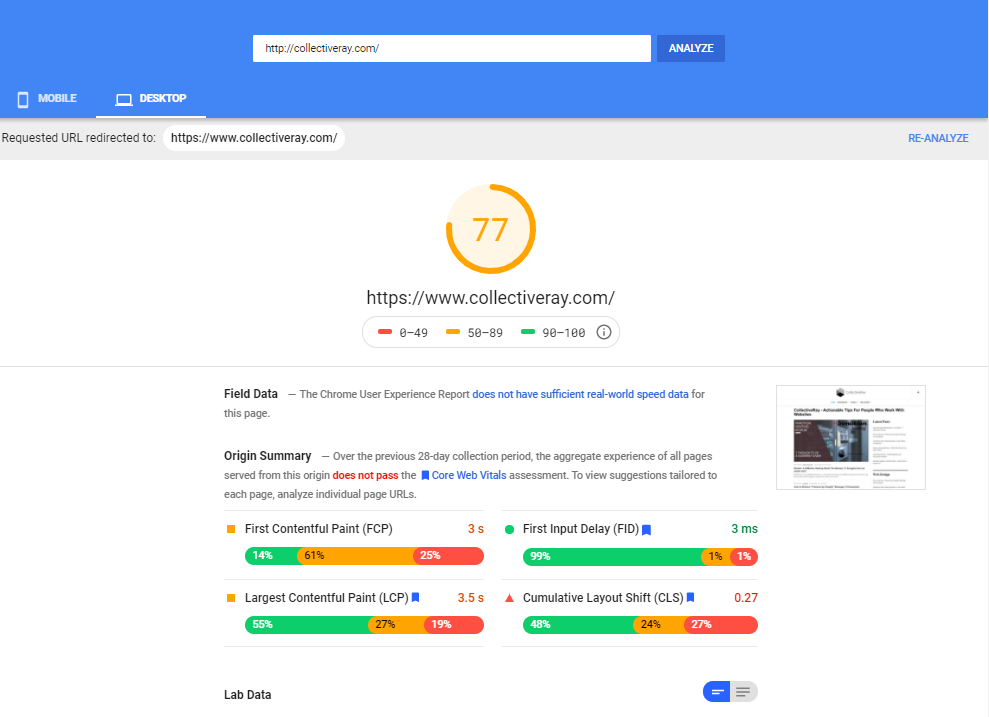
If there are any issues, you can find 39 tips to improve your page speed here.
Post-launch Checklist
Now that your new site is live, it’s time for some additional checks and housekeeping.
This phase starts from the day of launch and runs until a few weeks after.
1. Update Google Analytics goals/conversions as necessary
Some URLs might have changed during the migration process. If so, you may need to update the way that certain Google Analytics goals are evaluated or the pages where conversions happen.
We put this step first as it’s important to track the (hopefully positive!) results of your migration.
2. Update Facebook Pixel, Google Ads, or other marketing software as necessary
As with Google Analytics Goals, you may have other 3rd party software that needs updating to reflect the new website infrastructure.
For example, if you run Facebook campaigns, or Google Ads campaigns, you may need to update any events that are triggered on a page level, and then confirm they are still working as expected.
3. Add Heat Map software to see how the user experience has improved
Improving user experience should be a primary goal of a website migration. So we’ll want to measure how users are interacting with the new site.
We recommend using Heat Map software or user session recordings to see how users browse your new site.
Hotjar lets you do both!
4. Don’t let the old domain expire! (otherwise, you’ll lose your old links)
Your 301 redirects should all be in place. But don’t let go of the old domain!
While Google suggests that after a few months, they consider the domain to have moved, we like to play it safe.
Why? Because domains with healthy backlinks that are not renewed are typically bought and recreated as new sites.
If that happens to you… you could lose all traffic and power from links to the old domain.
So keep hold of the domain and renew it yearly so that any hits to the old domain continue to be redirected.
5. Analysis + troubleshooting
In the first few weeks after migration, you should be comparing metrics with the old site.
Has time on site improved? Is the bounce rate lower?
Look at each metric that’s important to your business and assess whether the change is positive or negative.
Is it negative? Try and figure out why, then make changes accordingly.
But don’t throw the baby out with the bathwater. Make small changes. Then in a few days, assess whether they have made a positive impact.
6. Check Coverage issues on Google Search Console
Now that Google is crawling the new site, you’ll want to have a look at the Pages report in Google Search Console (Indexing > Pages).

This will identify any issues that Google encountered while crawling your site. It will also show you the number of pages currently indexed and the reason for certain pages not being indexed.
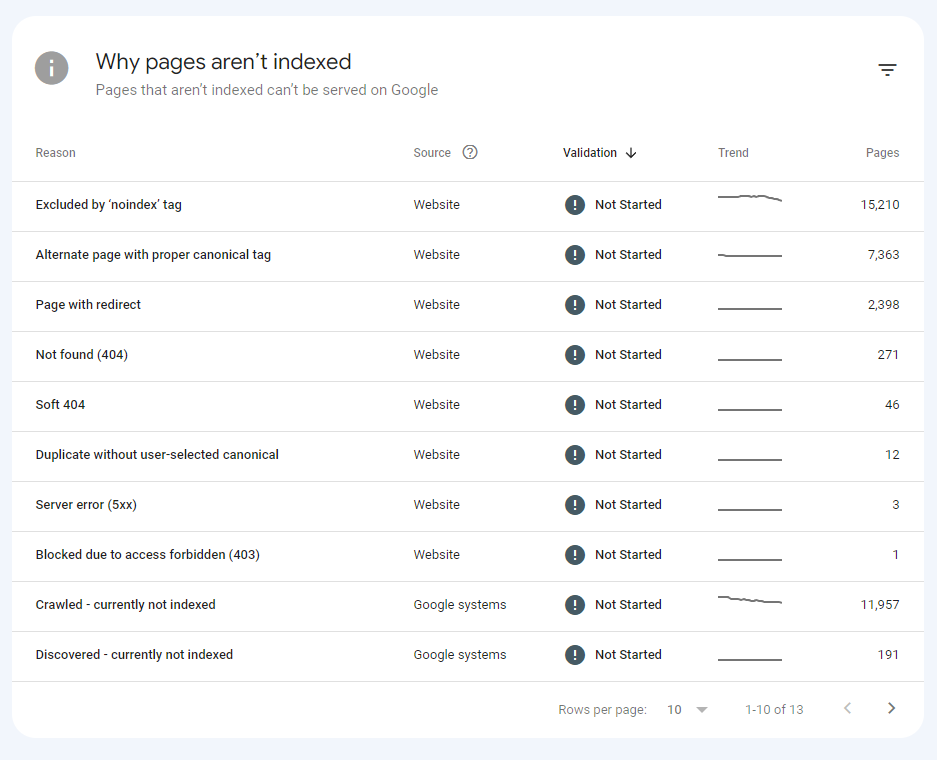
If you identify any issues or unexpected results, start working your way through resolving them.
7. Check Search Console Errors
As Google crawls the new site, Google Search Console will start showing any errors they encountered.
For example the Enhancements section will show you whether there are any errors in your structured data.
Pay attention to these errors. You’ll want to fix as many as possible (as quickly as possible).
8. Perform outreach to update any old backlinks where you can
While 301 redirects should pass full value, it’s still good practice to update as many backlinks as possible to point to the new URL.
We recommend exporting your backlinks from Seobility, then reaching out to as many sites as possible and asking them to update their links.
And while you’re emailing them, you can let them know about your cool new redesign 🙂
Note: we’d recommend prioritizing reaching out to anyone linking to your homepage.
9. Compare rankings and search traffic
Fluctuations in the first few weeks are normal. So don’t panic! It will take Google time to figure out your new site and pick up on all the redirects.
But after a month or so, you should see traffic settle down and ideally start to improve.
If not? We’d recommend keeping an eye on scheduled Seobility crawls to look out for errors and other issues.
And if you see any… fix them!
You can also check data from Google Search Console, which may give an insight into which pages are receiving fewer impressions/clicks. If you see a specific page with a big drop, then it might be worth giving that page some extra attention.
Ready To Relaunch Your Site?
A website relaunch is not a trivial task.
But with this full website relaunch and redesign checklist, we’ve tried to make this process as simple and easy to follow as possible.
As we mentioned at the start, not every step will apply to the circumstances of your migration or relaunch. So once you’ve digested all of the information, we recommend creating your own custom checklist from the steps above.
That way you can be sure you’ve done everything you can to make your redesign, relaunch, or migration an SEO success!
Have you been through any website redesigns or relaunches or migrations yourself? Have you got any lessons you can share with us? Do you think the above checklist would have helped you?
Let us know in the comments below.

Excellent checklist, and thanks for sharing. This list would have been must have for me a year ago. Then I moved all my content from old domain to a new domain. I redesigned. the webbpage, made it more secure and faster. If had this back, then I wouldn’t needed finding information all over the internet.
Hi Robert, thanks for your feedback! We hope that your relaunch still turned out successful 🙂