HTTPS (HyperText Transfer Protocol Secure) helps keep your website visitors safe and is non-negotiable for any modern website.
It also has SEO and usability implications. Google uses it as a ranking factor and major browsers clearly mark sites without HTTPS as unsafe.
In short: There are plenty of reasons to make the switch!
However, switching from HTTP to HTTPS isn’t just a matter of downloading a TLS/SSL certificate and clicking a button. There are many things to consider in order to safely make the switch, especially if your website is already live.
But have no fear: In this guide, we’ll dive deep into the topic of switching from HTTP to HTTPS and explain why it’s so important, how to make the switch and exactly what you need to keep in mind.
If you’re already familiar with HTTPS and why it’s important, you can skip to the section explaining how to make the switch.
- HTTP vs HTTPS - What are they, and what’s the difference?
- HTTP (Hypertext Transfer Protocol)
- HTTPS (Hypertext Transfer Protocol Secure)
- Why switch to HTTPS?
- Security
- SEO
- User experience
- Steps to switch from HTTP to HTTPS
- Backup your website!
- Set up a staging site & prepare on-page changes
- Getting an SSL certificate
- Installing your SSL certificate
- Publishing the staging site
- Post-switch changes
- Monitoring your traffic
- Summary / Checklist
- Your site is secure!
HTTP vs HTTPS – What are they, and what’s the difference?
In your online adventures, you might have noticed that some website URLs start with “https://” while others start with “https://”. Although this may seem like a minor difference, the additional “s” has some important implications for websites and their visitors.
HTTP (Hypertext Transfer Protocol)
HTTP has been the foundation of data communication on the web since the late nineties. It facilitates the transfer of information between your web browser and the server hosting the website you’re visiting, allowing you to watch funny dog videos on YouTube or read another phenomenal SEO article on the Seobility blog. 😉
The main downside of HTTP, however, is that it transfers information in plain text format, making it very easy for hackers to steal sensitive data while it’s being sent from the browser to the server.
![]()
This is where HTTPS comes in…
HTTPS (Hypertext Transfer Protocol Secure)
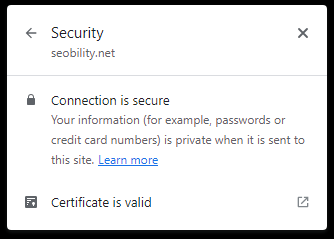
HTTPS is the secure counterpart of HTTP. It incorporates an extra layer of security through the use of TLS (Transport Layer Security) encryption protocols (formerly referred to as SSL, Secure Socket Layer). This encryption layer ensures that data exchanged between your browser and the server is sent in an unreadable format instead of plain text, rendering the content useless to potential eavesdroppers.
![]()
Why switch to HTTPS?
There are a number of reasons to use HTTPS, including security, SEO and usability.
Let’s take a look at each one in more detail.
Security
Switching to HTTPS ensures communication between the browser and the server is encrypted. This means that any information sent from the browser, like information provided in contact form submissions and payment requests, cannot be read if it’s intercepted.
Now, you might be thinking: “How can someone intercept a message being sent from my computer to a website?”
Without diving too deep into the technical side of things, here’s a basic overview of how it might work…
When you send information through a contact form, it travels via the router, through a bunch of wires spanning (almost) the entire globe, to the server, which could be on the other side of the world. The information you sent could be intercepted by someone on its way to the server, which would allow them to view your message, as well as other important information you send along with it.
One of the most common examples of this happening is the use of a spoofed public WIFI. Sometimes a hacker will spoof a public WIFI by setting up a hotspot with the same name as the public WIFI network, hoping that someone will connect to it. If someone does connect to the hacker’s hotspot, then all information they send travels through it – allowing the hacker to see what they’re doing!
If this information is encrypted using TLS/SSL, then the hacker can’t do very much with it. But if it’s not, then they can get their grubby little hands on your payment information, contact form message, or other personal information.
There are many other ways that information can be intercepted, but the above example is easy to understand and clearly demonstrates the value of HTTPS when it comes to security.
Here’s an example of an unencrypted message.
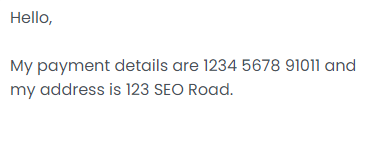
And this is what the same message looks like encrypted:
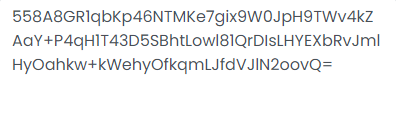
Completely useless!
SEO
Serving your website over HTTPS also has important SEO benefits.
Google announced back in 2014 that HTTPS is a (lightweight) ranking signal. Serving pages securely, in which HTTPS plays an important role, is also part of Google’s page experience update, together with Core Web Vitals and other usability metrics. So although it’s just a part of the ranking signal, it has more SEO benefits than just its isolated impact on rankings.
HTTPS in no way compares to more important ranking factors like content relevance or website authority/trust when it comes to direct SEO impact. However, it can have an indirect impact on rankings too, since it influences your website’s user experience and how visitors behave on your site.
User experience
Moving from HTTP to HTTPS has a number of benefits from a user experience standpoint, which may also contribute to your performance in the SERPs.
The most obvious benefit, based on what we’ve discussed so far, is that it helps protect your users’ data. Besides being mandatory by law in most countries today, protecting users’ data obviously helps to improve their experience.
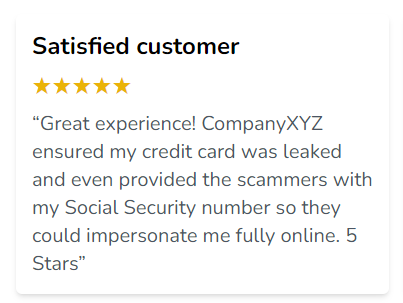
Probably not the sparkling review we’re after!
However, the use of HTTPS also has a direct impact on how users interact with your website. Most major browsers, including Edge, Chrome and Firefox, will issue a warning to users when accessing a site without it…
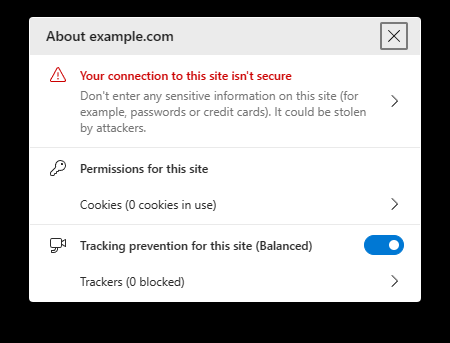
Or at the very least, these browsers will mark the site as insecure in the address bar.

Although some users may understand what this warning means and know how to browse HTTP websites safely, most won’t. This will most definitely lead to some of your visitors bouncing to one of your competitors – especially if they’re asked to share their data on your website. And if Google notices that many visitors are leaving your website and returning to the SERPs, it sends a strong signal that your website didn’t provide a good experience and that it should probably be ranked lower.
As you can see, there are plenty of reasons why you should move to HTTPS.
- It protects your users and their data.
- It’s important to search engines like Google.
- It will improve the user experience on your website.
If that’s not already enough good reasons, it also ensures that you comply with local and international laws.
Now that you’re convinced it’s the right choice, let’s jump into how to make the switch!
Steps to switch from HTTP to HTTPS
Although transitioning from HTTP to HTTPS isn’t too challenging, it’s important to do it correctly to preserve as much of your ranking power as possible and avoid duplicate content or other SEO issues.
Before getting started, however, there’s something we need to do.
Tip: Since you’re planning on migrating your site over to HTTPS, it may be worth performing a quick SEO audit to check if there are any severe issues on your website that you should fix before you make the switch.
A tool like Seobility can crawl your complete website and check for technical errors and on-page SEO issues automatically. In case you don’t have a Seobility account yet, we offer a 14-day free trial to test our premium features.
Backup your website!
Before making any major changes to your website, it’s important to create a backup in case something goes wrong. Most of the changes we’ll make are quite easy to reverse, but it’s still worth backing up the site in case you make a mistake. It wouldn’t be the first time someone breaks their site while making routine changes, and certainly won’t be the last.
If you’re using WordPress, you can use a plugin like UpdraftPlus, Jetpack, BackupBuddy or any of the (many) others with a good reputation.
If you have cPanel on your site, it’s as easy as clicking a button.
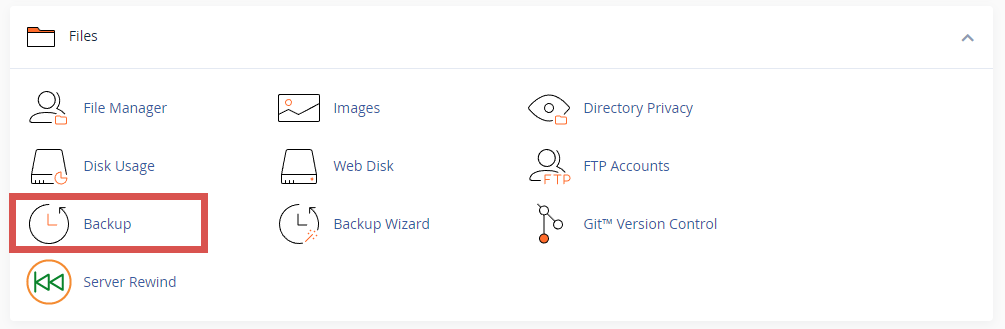
After navigating to the backup section under the file tab, click on “Download a Full Account Backup”.
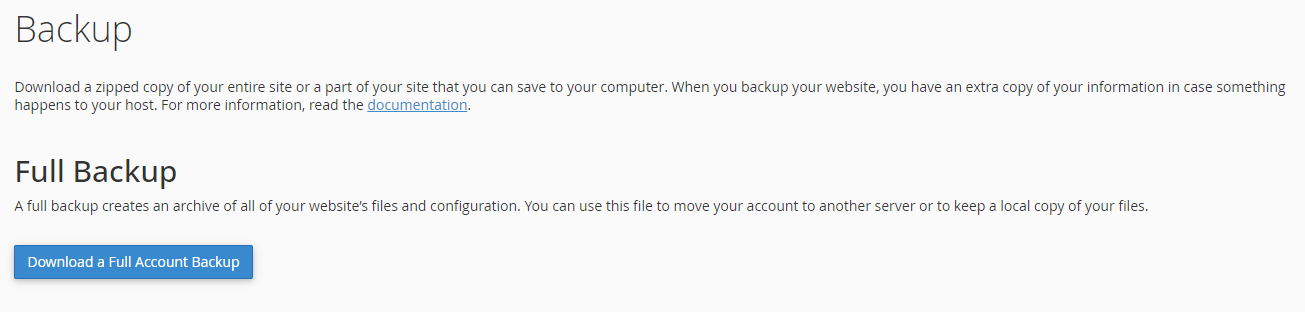
It only takes two minutes but can save you days of work if something goes wrong.
And if something does go wrong, this guide shows you how to restore a WordPress site from a backup.
Set up a staging site & prepare on-page changes
After backing up the site, it’s worth setting up a staging site in order to prepare the on-page changes before migrating to HTTPS.
If you have a particularly small website or you’re not getting any search traffic, you might be able to get away with making these changes after switching to HTTPS. However, it’s generally best practice to prepare the on-page changes on a staging site ahead of time. This ensures that you send clear signals to search engines when you do make the switch, rather than rushing changes to the main site after implementing HTTPS.
Setting up a staging site is really easy once you know how. This post by Themeisle shows you exactly how to do it on WordPress.
Staging site ready? Let’s dive into the changes…
Canonical Links
The most important change you should make is changing the canonical tags to the new URL with HTTPS. The reason is that we’re later going to be 301 redirecting all HTTP pages to their HTTPS counterparts. But if the HTTPS page in turn has the HTTP version as a canonical, you’re creating a kind of infinite loop, since the pages will be pointing to one another.
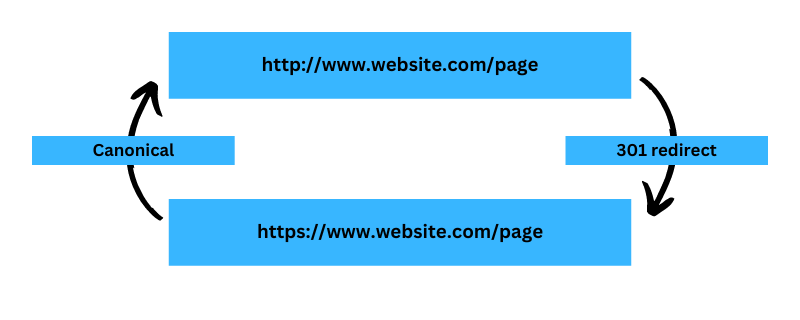
Definitely something we want to avoid!
If you’re on WordPress and using a plugin like Yoast, this will likely be changed automatically when you apply the redirect (you may have to change the main site address URL in the settings, though). That being said, this won’t be the case for everyone.
If you don’t have canonical tags set up, it can be worth using an SEO plugin to do this.
Internal linking
Your web pages refer to each other through internal links – but all of the addresses they point to are about to change. Since all links on your site currently use the HTTP version, they need to be changed to point to the HTTPS URL.
First, it’s a good idea to change the main navigation, footer navigation, sidebar and other important navigation elements. Since these are site-wide or at the very least used on many different pages, they’re the most important links to change.
The homepage, main category pages and other important pages are next in line.
This will get you 80% of the way there and ensure that the most important internal links on your website are pointing to the correct URLs and sending clear signals to search engine crawlers.
You can then go through the rest of the pages one by one, if you have a small website, or use a plugin like Better Search Replace if you’re on WordPress, to speed up the process. If you do choose the plugin method, make sure to backup your site beforehand.
Schema markup
Schema markup is another important aspect, especially if you’re using your own custom-written markup. Some SEO plugins will make the necessary changes automatically if you change the main website URL, but it’s important to double-check whether this is the case or not with your plugin.
If you’re not using a plugin, make sure to switch all URLs to the secure version throughout your markup now.
In WordPress, you can either make the changes on a page-by-page basis manually, or use a search and replace plugin to speed things up. Simply replace all occurrences of https://yourdomain with https://yourdomain using the plugin.
If you’re writing your schema in a separate file, most code editors have a bulk edit feature that will allow you to make these changes.
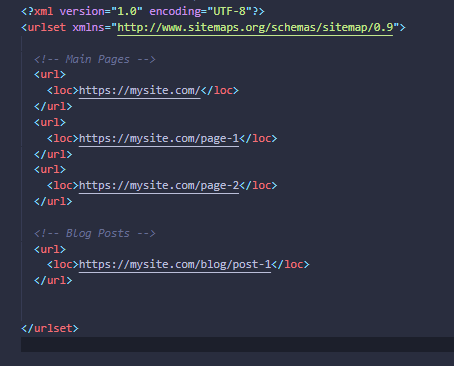
Sitemaps & Robots.txt file
Next, check your sitemap(s) and Robots.txt file and make any necessary changes to ensure all links are pointing to the correct version.
Again, this is something that many SEO plugins will do for you when you change the main site URL later, but it’s still worth double-checking whether this is the case with your plugin. If not, change them on the staging site now to ensure a smooth switch.
HREFLang links
The hreflang tags on your pages are another important thing to consider. These are generally added to WordPress sites using SEO plugins or multi-lingual plugins, so the main site URL can usually be changed in the settings in order to reflect these changes site-wide.
Now that you’ve finished preparing your staging site, make sure you’ve saved everything, as we’ll need it later.
But now it’s time to get your SSL/TLS certificate.
Getting an SSL certificate
SSL/TLS certificates are available from many different vendors. However, in 99% of cases, it’s easiest to obtain the certificate directly from your hosting provider. As a matter of fact, most hosting providers will offer free SSL/TLS certificates as part of their hosting plan! Although this free certificate might not work for websites handling a lot of sensitive personal data/payment details, it works great for blogs and smaller sites.
If you require something more, you have a few options:
Certificates with Domain Validation (DV):
Domain-validated certificates are suitable for most websites. This certificate only requires the applicant to prove they have control of a domain and nothing else. The validation usually takes place via an e-mail to the domain holder. Domain-validated certificates are generally pretty cheap, starting at roughly $50 per year.
Certificates with Organization Validation (OV):
The organization-validated certificate actually verifies the organization as well as the website ownership. Although the validation for these certificates is more extensive, it’s a common misconception that they provide better encryption. The main difference is in the level of validation of the certificate holder’s identity. These certificates often come with a warranty of up to $1,000,000 or more, making them a great fit for e-commerce stores.
Due to the complex validation process, this certificate is more expensive than a certificate with domain validation. Organization-validated certificates start at roughly $100 per year.
Certificates with Extended Validation (EV):
The Extended Validation certificate has the highest level of authentication and is generally reserved for large businesses or those dealing with highly sensitive information, although it can also be a great option for medium-sized e-commerce stores. This type of certificate is only issued by specialized authorization offices that check the company information in far more detail. These certificates provide the highest warranty. Prices start at around $700 per year.
Once you’ve bought the certificate you need from your hosting provider, you can move on to the next step.
Tip: Hosting providers will often help you install your certificate after purchasing it, so it can be worth reaching out to them for help if you get stuck. Just keep in mind that hosting providers aren’t SEOs, so you’re still responsible for making the changes in the right order and ensuring everything is set up correctly from an SEO standpoint.
Before moving on:
In the upcoming sections, we’re going to install the certificate and make the switch from HTTP to HTTPS on our live website. As is always the case when making changes to your site/server, it’s worth waiting for a time when there’s little traffic going to your site. Check your analytics to see when your website gets the least visitors and try to schedule a few hours to make the changes at this time if possible.
Installing your SSL certificate
If you didn’t purchase your SSL certificate from your hosting provider, or if for some reason they don’t offer support for installing it, you’ll need to install your SSL certificate on your own.
The exact process can differ a lot depending on your hosting setup. That being said, since most of our readers use WordPress, we’ll focus on how to install an SSL certificate on a WordPress website using cPanel.
To do this, you’ll need to download the ZIP file with the SSL certificate from your provider and log in to your cPanel. Then in cPanel, search for “SSL”:
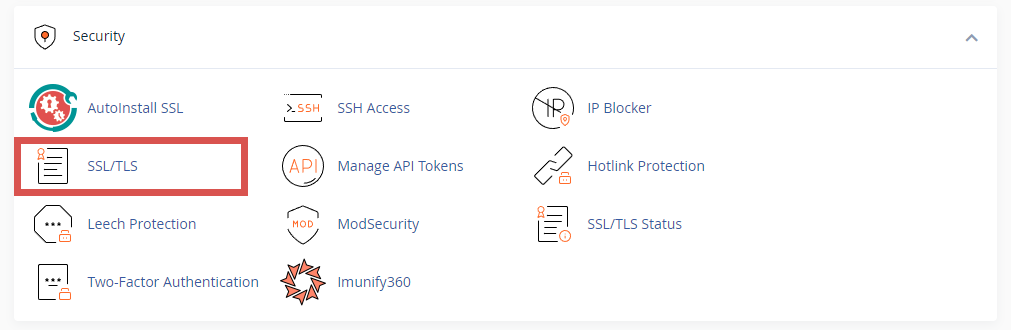
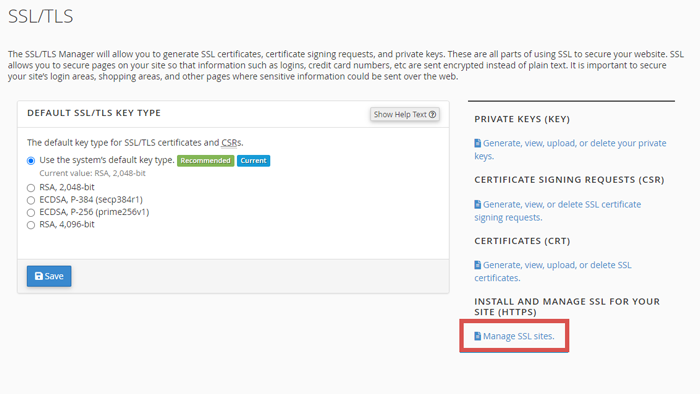
In the “SSL/TLS” menus, click on “Manage SSL sites”:
Next, select the domain you want to install the certificate on.
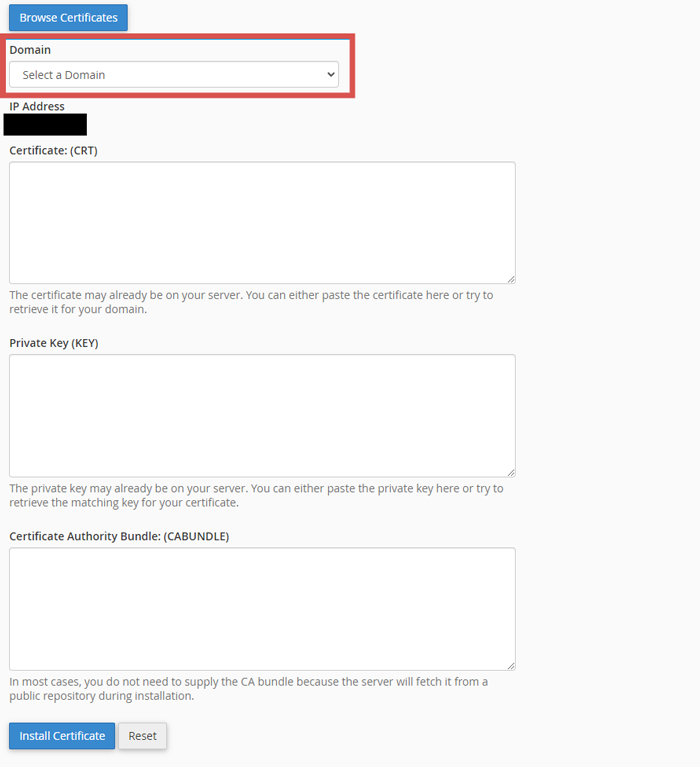
Then, using the information in the ZIP file, fill in the remaining fields.
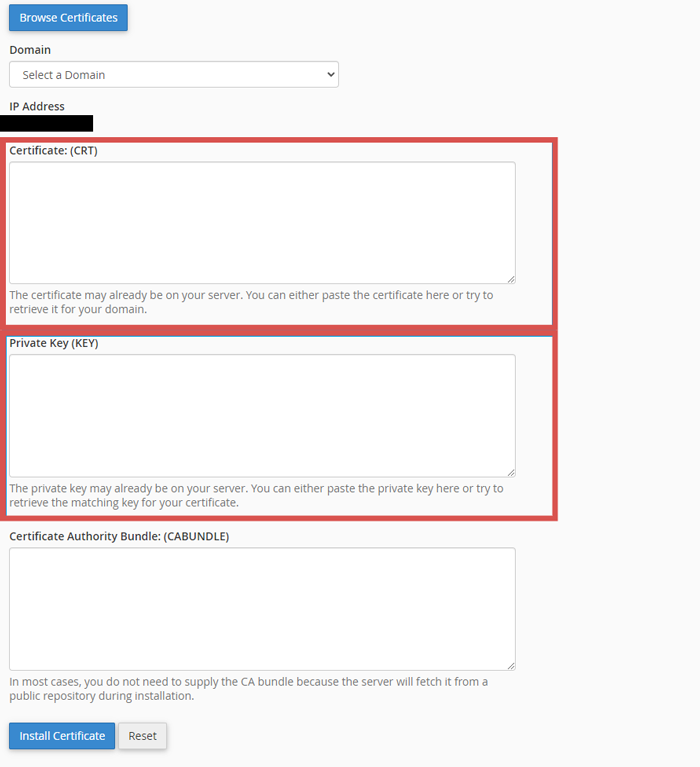
You can now install the certificate.
Now that we have the certificate installed, it’s time to ensure all traffic on our site is redirected to the secure HTTPS version.
Forcing HTTPS
Forcing HTTPS means redirecting all traffic to the HTTPS version of your website, preventing people from accessing the insecure version and protecting your users.
Since creating an HTTPS version of each URL is technically creating a new URL, we force HTTPS by using a 301 redirect to ensure all important SEO signals are transferred over to the new URL. This also prevents duplicate content issues that might occur due to having multiple versions of the same page – one HTTP version and one HTTPS version – on your website.
Before we dive into the details, however, it’s important to understand the effect that 301 redirects have on page rank.
As explained in this article on how 301 redirects pass PageRank, almost 100% of a page’s ranking power is passed through a 301 redirect. However, a tiny, almost negligible amount is lost in order to prevent abuse.
By 301 redirecting all of the URLs with HTTP to HTTPS, we not only ensure that there’s no duplicate content, but also ensure that ranking signals for each page are concentrated on a single URL. By forcing HTTPS, visitors and bots who reach your site through external links that still use the HTTP URL will automatically be redirected to the correct version.
We want to create a redirect for every single page on our website. This may seem like a ton of work, but luckily this can be done very easily site-wide. That’s because we don’t have to create a redirect for every single page on the site individually!
Below, we’ll focus on WordPress sites hosted on an Apache server using the .htaccess file. This is one of the most common WordPress setups and also the easiest way to implement 301 redirects.
301 redirects using the .htaccess file
In order to apply the 301 redirect site-wide, you first need to navigate to the .htaccess file.
First, go to file manager in cPanel.
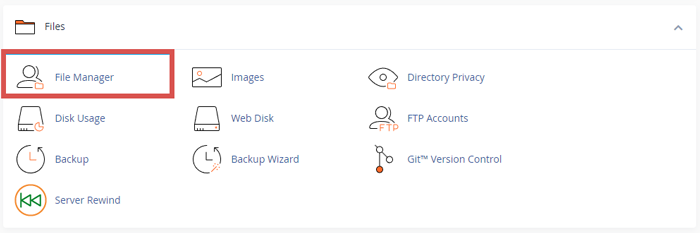
Then, navigate to the “public_html” folder and right-click on the .htaccess file to edit it.

Now add the following rule to the file:
RewriteCond %{HTTPS} off

RewriteRule .* https://%{HTTP_HOST}%{REQUEST_URI} [L,R=301]
Congratulations! Your site has now been moved to HTTPS.
Next, we need to publish the staging site we created earlier and go through some post-switch changes to ensure that everything is running smoothly.
Publishing the staging site
Now that you’ve moved over to HTTPS, it’s time to publish the staging site to ensure your on-page links are all pointing to the secure version of your website.
If you forgot to make a backup of your site previously, make sure to do so before publishing the staging site so you can recover the original site if something goes wrong.
The guide we linked to earlier for creating the staging site also covers the step of pushing the staging site. In case you missed it, here’s the link explaining how to do it.
Post-switch changes
Now that all of your pages redirect to the secure URL, the main migration is complete. However, there are still a number of important tasks that need to be done before you can lie back in your hammock and admire your work…
Existing 301s
One of the first things you need to do is to check the existing 301 redirects on your website and change them to point to the final page.
For example: Say you have page A that redirects to page B (both HTTP):
https://mysite.com/page-A > https://mysite.com/page-B
You should change the URL for page B to the HTTPS version to prevent going through multiple redirects:
https://mysite.com/page-A > https://mysite.com/page-B
It can also be worth setting up a redirect from the HTTPS version of page A to the HTTPS version of page B to fully close the loop:
https://mysite.com/page-A > https://mysite.com/page-B
It might be a lot of work if you have a lot of redirects, but sending clear ranking signals and preventing redirect loops is standard SEO best practice.
CDN links
If you’re using a CDN to serve images or other media, it’s important to check whether they’re being served securely over HTTPS. If not, it’s important to make sure they are from now on so you don’t see warnings about insecure content on the page.
In most cases, you won’t need to change anything, but it’s worth double checking before moving on to the next step.
JavaScript, CSS files, images etc.
Fixing CDN links doesn’t mean all your media issues are solved, however. It’s important to check if embedded media and other important files (images, videos, CSS, JS) are served over HTTPS, too. If they aren’t, browsers will display a warning, even if the page where the media is embedded uses HTTPS.
If you do run into any mixed content warnings, make sure to fix any embedded media issues as quickly as possible. Here’s how to do it:
-
- Identify the resources that are still served over HTTP. You can do this by running a website crawl with Seobility. In the “Tech & Meta” section of your on-page audit, you’ll find “Non-HTTPS content on HTTPS pages”:
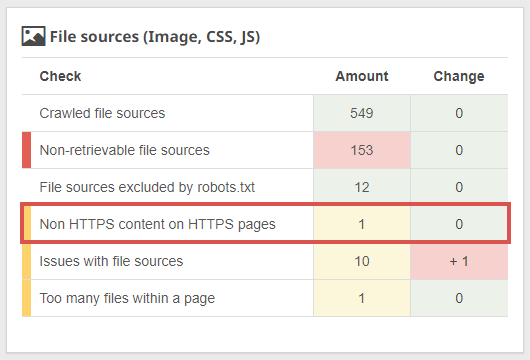
- Make sure that the files listed there can be accessed via HTTPS and adjust all links pointing to these files. If you’re using a page builder or certain plugins that generate the files, it might be necessary to change the website’ s URL in the plugin settings.
Perform an on-page audit
Now that you’ve completed all of the necessary on-page changes, it’s time to double-check your work.
If you haven’t done so yet, running a crawl on your website now will help you get a clear overview of your site and whether you missed any important changes. Some of the most important things to check in Seobility’s Tech & Meta section (Project > Onpage > Tech & Meta) include:
Pages crawled & pages with technical problems in the Crawling statistics
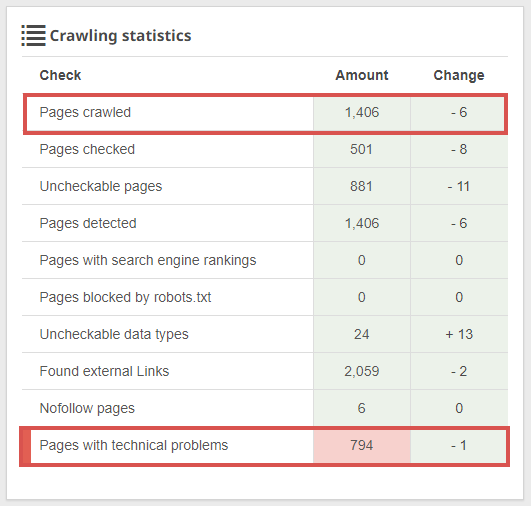
Non-HTTPS content on HTTPS pages in the File sources analyses

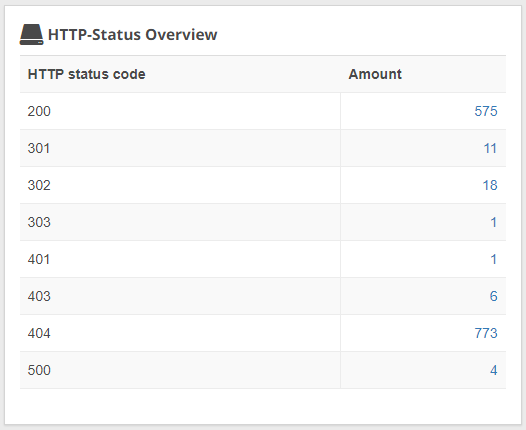
And the HTTP-Status Overview in its entirety.
The most important analysis to check in the Structure section (Project > Onpage > Structure) is the “Redirects” analysis:
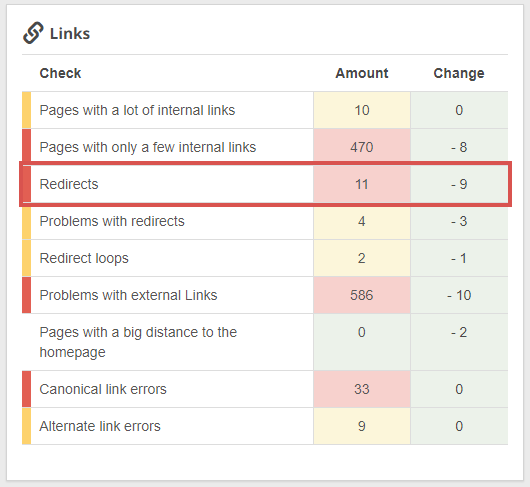
If there are any internal links on your website that still point to the HTTP version of a URL (and if you’ve set up your redirect correctly), they will be listed here, as these links will cause a redirect.
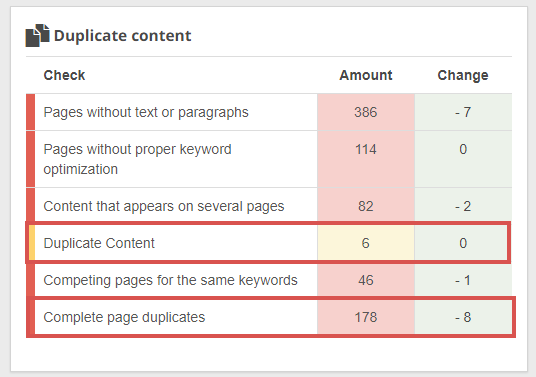
However, if there are any issues with your redirect, it can create duplicate content problems, which will be displayed in the “Content” section:
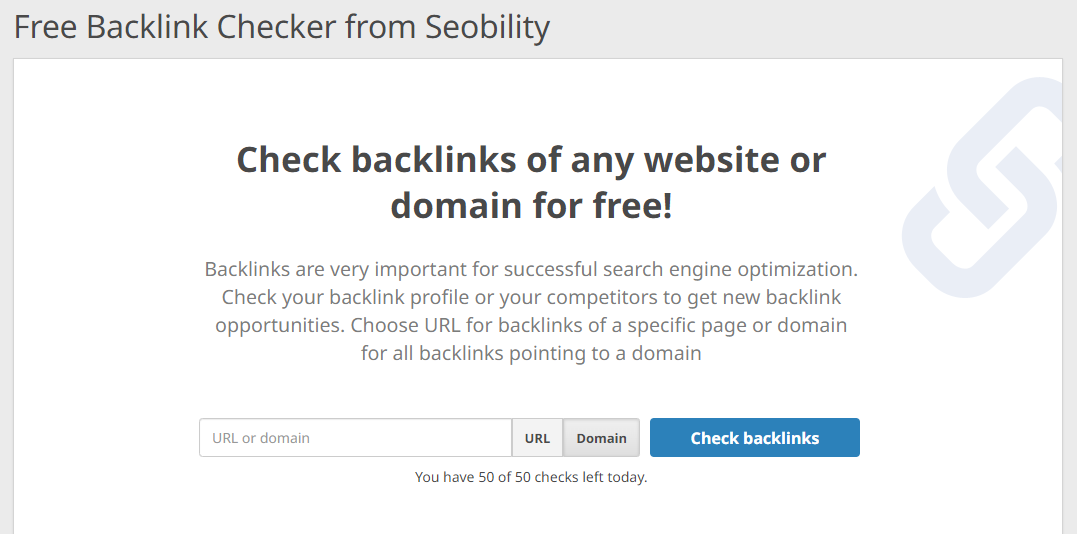
Another handy tool that can help you check if your website is properly redirecting to the HTTPS version is the free Seobility Redirect Checker.
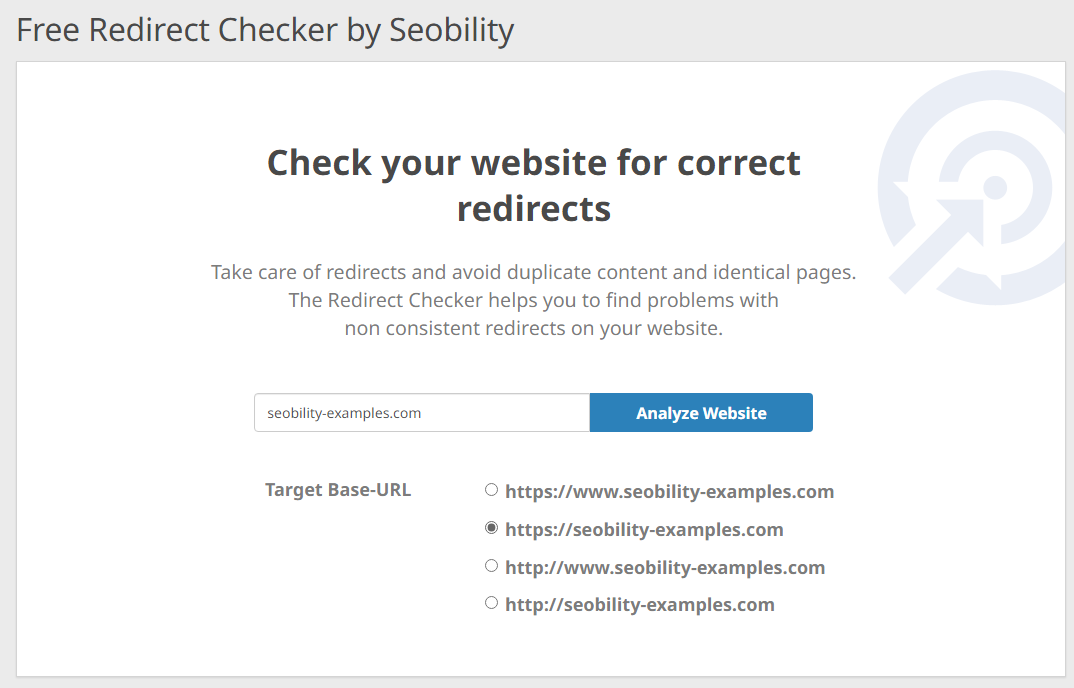
Just enter your domain and choose the URL version that visitors and search engines should be redirected to as the “Target Base-URL”.
Backlinks
Once you’ve fixed any on-page issues, it’s worth going through your backlinks to check whether you can change any of them to point to the HTTPS version of your website.
If you have a list of directories and social channels linked to your website, it’s worth going through them first and changing the links to point to the secure version.
If you have an account, you can also go to the backlinks section of your project in Seobility (Dashboard > Project > Backlinks). You can also use Seobility’s free Backlink Checker to find your off-site profiles:
If you have other external links that you can easily change, now is the time to try to point them to the secure version. Although this isn’t highly important, since users will already be redirected to the secure version automatically, it can be good to do this for links that don’t take much time to change.
Google Search Console & Google Analytics
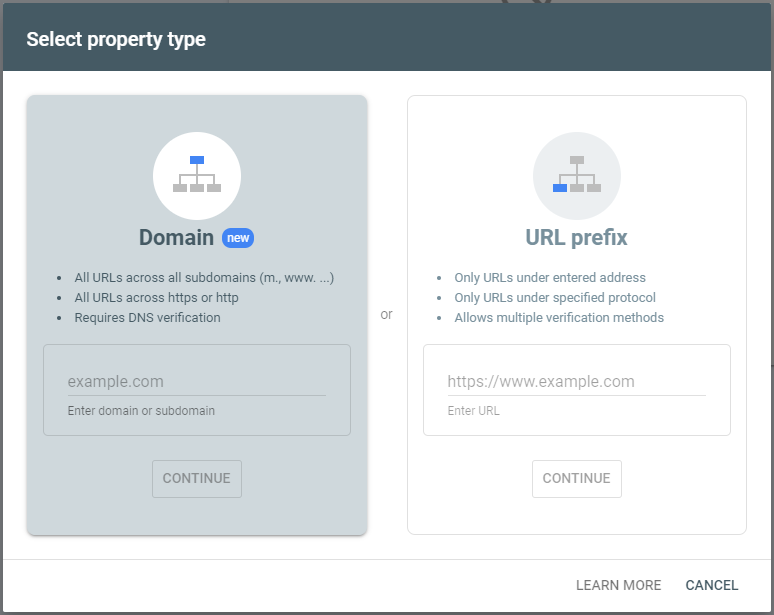
Depending on how you set up Google Search Console, you may need to add a new property for the HTTPS version of your site to ensure that it continues to collect data.
If you used the new Domain Property to add your site to Search Console originally, you don’t need to do anything. If you used the URL prefix method, you should set up a new property to ensure data is collected for the HTTPS version.
For Google Analytics, you’ll need to set up a new property in order to keep collecting data. This article by Google shows you how to set up your GA4 property correctly.
Google Ads / Microsoft Ads
If you’re running ads on platforms like Google Ads or Microsoft Ads (Bing), you should change the URLs that your ads point to directly to the new HTTPS version. This will prevent your ads from going through a redirect, improving the user experience. This can be done by changing the target URL field in your ads.
Other marketing channels/software
Next, it’s worth going through any other marketing channels you use to ensure that as many of the links as possible are pointing to your new secure URLs. Some of the channels worth considering include:
- Email footers
- Email marketing software
- Text/QR code campaigns
- Banner ads
- Invoices/invoicing software
- Bing Webmaster Tools
Monitoring your traffic
Last but not least, it’s important to monitor your traffic in the weeks after you make the switch from HTTP to HTTPS. Although it’s very uncommon for sites to see a drop in traffic after a routine change like this, it’s still good practice to monitor your traffic in case something goes wrong.
If you see a sudden drop in traffic after making a switch to HTTPS, take some time to try and diagnose what the issue could be. Some things to check include:
- Warnings in Google Search Console
- Issues with your analytics/GSC setup
- Issues with canonical tags
- Issues with redirect loops
- Current updates or search changes rolling out
Summary / Checklist
To recap, here’s a checklist of all the important steps you should consider when switching from HTTP to HTTPS:
- Backup your website!
- Set up a staging site & prepare on-page changes
- Get an SSL certificate
- Install your SSL certificate
- Force HTTPS
- Publish the staging site
- Post-switch changes
- Monitor your traffic
Your site is secure!
That wasn’t so hard, was it?
By switching your website from HTTP to HTTPS, you’ve improved your site’s user experience, search optimization and security.
An easy win!
If you have any questions or just want to say hi, feel free to leave a comment below and we’ll get back to you as soon as we can.