Website speed directly impacts user experience, search visibility, and even conversion rates.
And when it comes to improving speed, the order in which you optimize matters. Many people start with on-page tweaks like image compression or caching, but your server and infrastructure are often the real foundation of performance and one of the most overlooked areas.
Before tinkering with design or front-end features, it’s crucial to optimize the underlying systems that power your site. Think of it like tuning the engine before polishing the paint: if your server, DNS, or hosting setup is slow, other improvements won’t deliver their full benefits.
In this post, we’ll share practical tips for optimizing your server and infrastructure so you can build a faster, more reliable foundation for your website.
- How server response time impacts website load times
- 1. Upgrade to the latest stable version of PHP
- 2. Upgrade (or change) your host
- 3. Switch to a premium DNS provider
- 4. Enable HTTP/3
- 5. Enable TLS 1.3 for faster “handshakes”
- 6. Enable caching at the PHP level
- 7. Enable a CDN to serve static content from multiple locations
- 8. Use cookie-free domains for static files (CSS, scripts, etc)
- 9. Upgrade MySQL to MariaDB
- 10. Enable Object Caching to store database query results
- 11. Swap Apache to Litespeed Server or NGINX
- 12. Remove other websites from the server
- 13. Eliminate PHP modules or tasks you don’t need
- Next steps
How server response time impacts website load times
Server response time (often measured as Time to First Byte, or TTFB) is the duration between a user’s request and the moment your server begins sending back data. It’s the very first step in the page loading process, and any delay here creates a bottleneck.
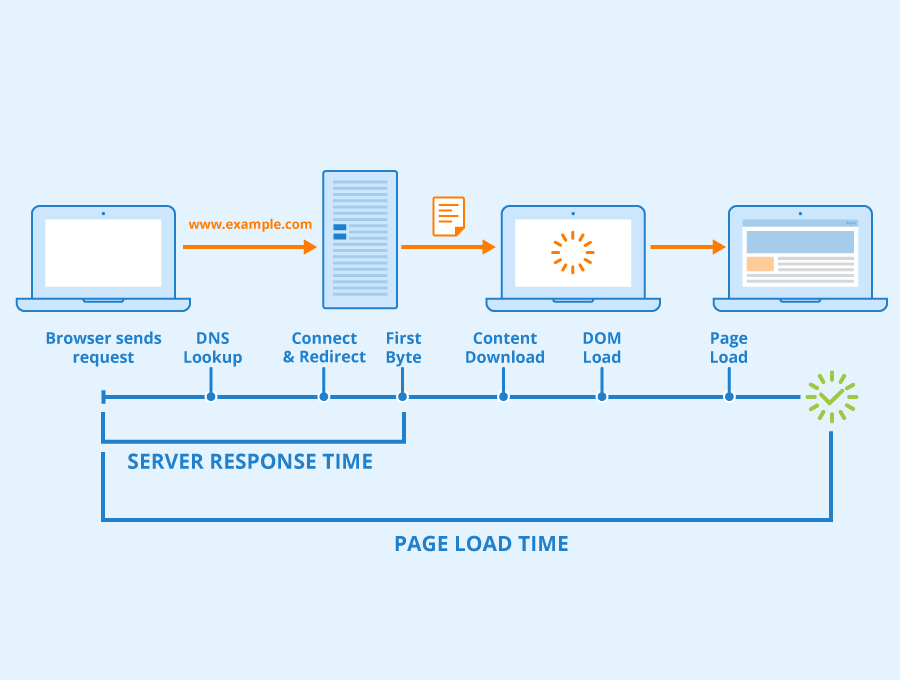
If your server is slow to respond, the browser has to wait before it can start rendering content. This not only pushes back when visible elements appear on the screen but also slows down subsequent steps like loading stylesheets, images, and scripts.
This can hurt the speed at which your web page loads, both for visitors and search engines. In turn, this can affect things like conversion rates, bounce rate, search engine rankings, and even mentions by popular LLMs like ChatGPT and Claude.
The tips in this guide will help you optimize your server speed and the efficiency with which it loads resources, whether through caching, keeping software up to date, or even switching hosting packages to provide you with more resources.
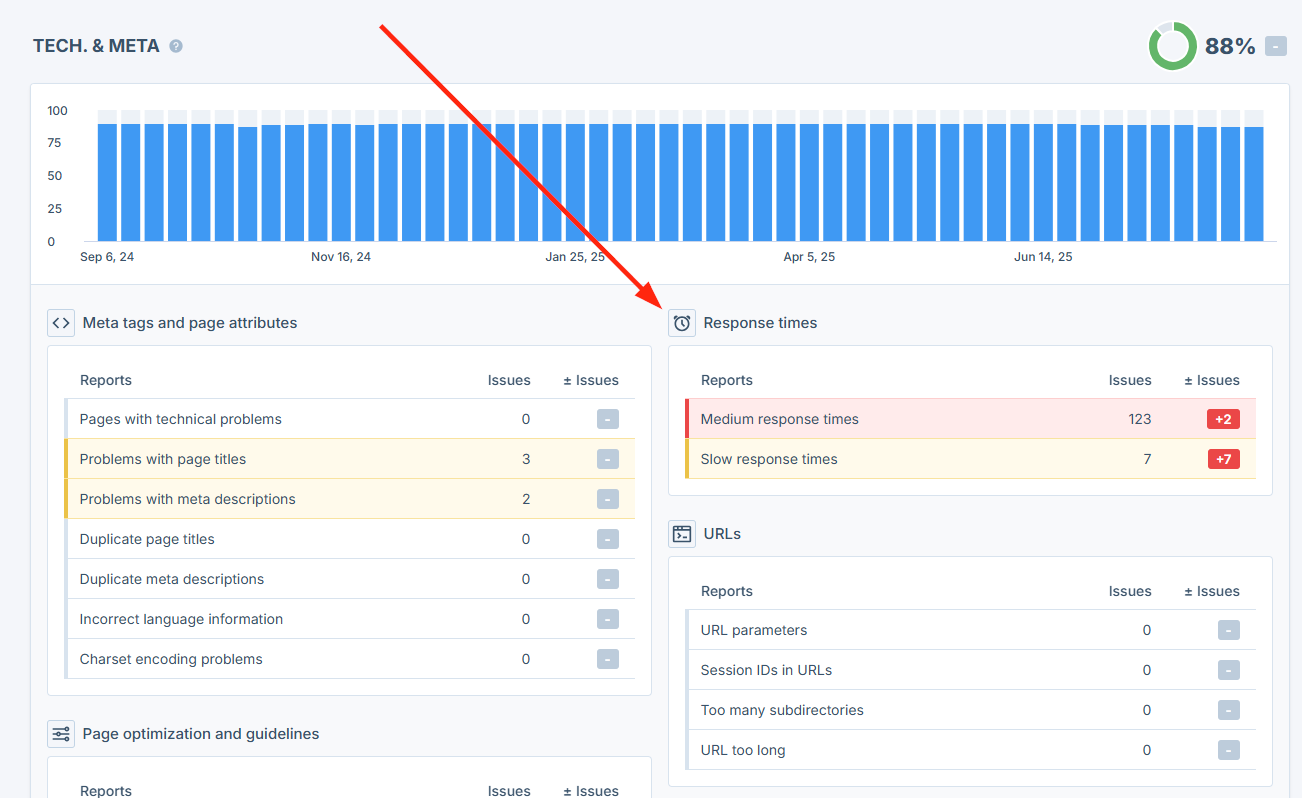
Tip: While implementing the tips in this article, you can use Seobility’s Website Audit feature to check your server response times, helping you to detect pages with slow response times and track your optimization progress.
Now let’s jump straight into the tips!
1. Upgrade to the latest stable version of PHP
Difficulty: Easy
Why should you do it?
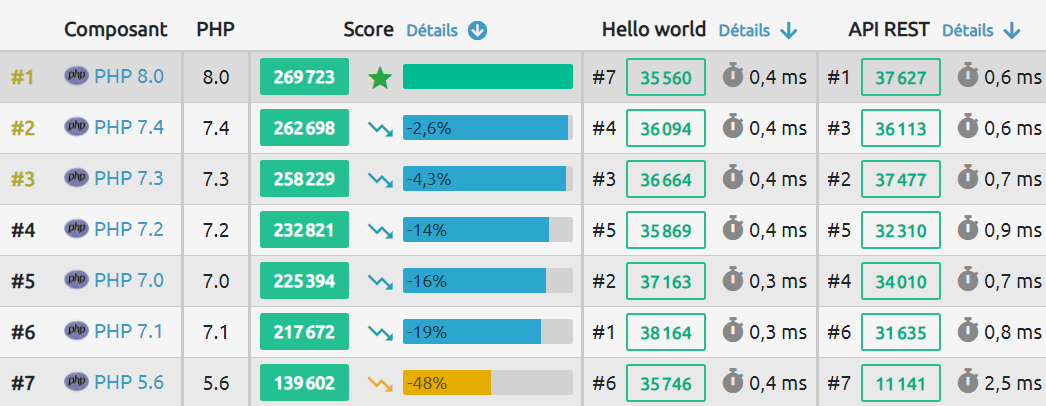
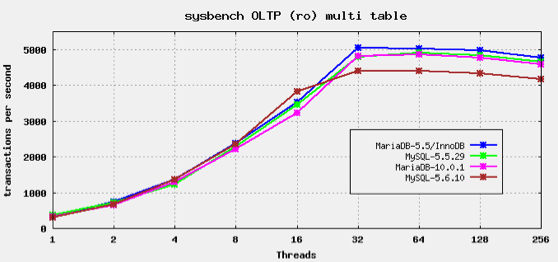
If your website is running on PHP, then upgrading to the latest stable version can be a quick and easy page speed win.
Because benchmark tests (like this one) show PHP is getting faster and faster.
How to do it
It’s going to vary from host to host.
But it will often be as simple as selecting a new version of PHP from a dropdown or checkbox, like this one on Cloudways.
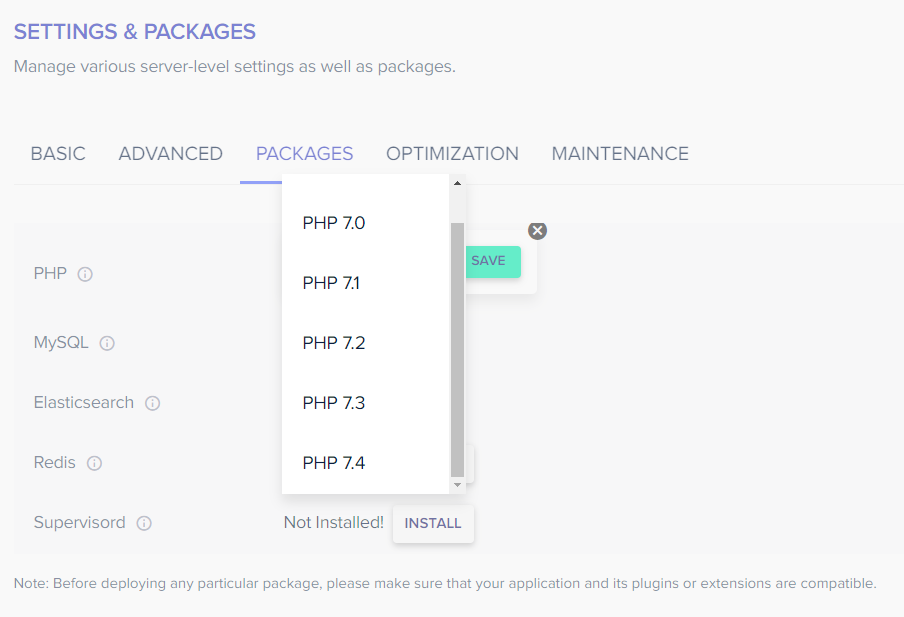
Or this one in CPanel.

Further reading: Get a faster, more secure website: update your PHP today (wordpress.org)
2. Upgrade (or change) your host
Difficulty: Easy to advanced (upgrading with your existing host should be straightforward, but switching to a new provider may require a migration strategy)
Why should you do it?
You get what you pay for in life. Web hosting is no exception.
And if you’re on a cheap, shared host, you’ll be splitting resources (memory, CPU usage etc) with a ton of other websites. Which is going to have a HUGE impact on speed.
If that sounds like you, then this step is a no-brainer.
How to do it
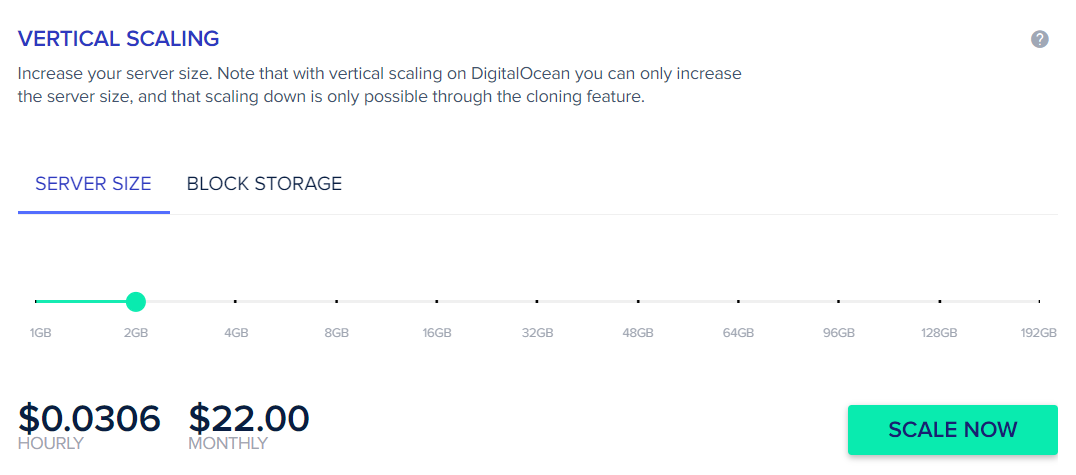
If you’re happy with your current host and just want a faster server, this can be as simple as asking them to upgrade your hosting package.
In fact, if you’re on a VPS, you’ll often be able to upgrade your server through your control panel.
But migrating to a new host can be a bigger job.
The good news is that many hosts will include free website migration for new clients. But if you need some guidance on moving to a new server, then check out our website relaunch guide. You can also find an overview of recommended hosting providers on QuickSprout.
3. Switch to a premium DNS provider
Difficulty: Intermediate (make sure you replicate your existing DNS settings exactly when switching)
Why should you do it?
When a user types your domain into an address bar (or clicks your page on Google) their browser has to translate the URL into an IP address. That translation is handled by a DNS server, and happens before a visitor can get to your site and start downloading content.
A slow DNS server can lead to slow connections to your site. And if your DNS server goes down, then a user might not be able to connect at all.
The good news? By switching to a premium DNS server, you’ll boost this initial connection time, and get visitors on to your site (and starting to download content) faster.
How to do it
There are a number of premium DNS providers available, and the process of switching is fairly straightforward.
All you’ll need to do is point your domain’s nameservers to the new provider, then replicate your existing DNS settings.
Further reading: Why Premium DNS is No Longer Optional (Kinsta)
4. Enable HTTP/3
Difficulty: Intermediate (change to server config)
Why should you do it?
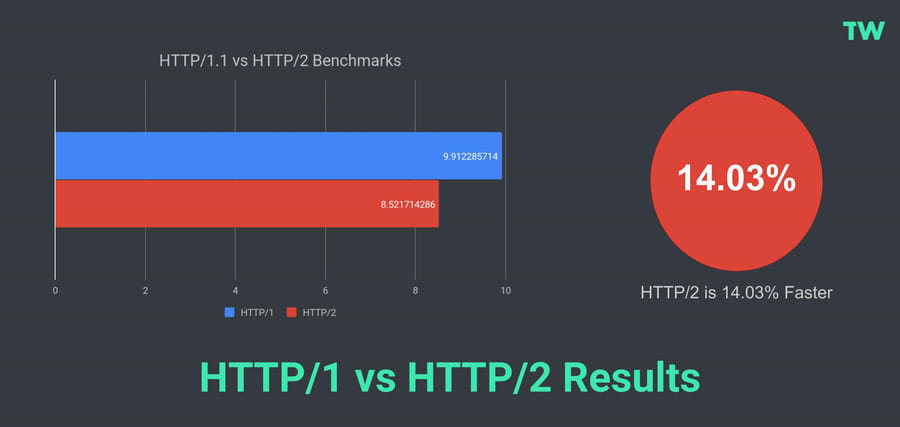
HTTP/2 and HTTP/3 are newer versions of the HTTP protocol that enables all web traffic on the internet since 1999, with optimized data transfer speeds vs HTTP/1.
HTTP/2, released in 2015, was the first major improvement of the protocol.
It addressed several underlying performance issues caused by the evolution of the web.
We won’t dig deeply into the benefits of HTTP/2 here.
But did you know that HTTP/2 suffers from its own performance issues?
On HTTP2, when one data packet is delayed, it slows down ALL of the packets that come after it, until that specific packet is resent and received. This means that if there’s a delay with one piece of data, it can hold up the entire process of loading a webpage, making everything else wait until that one piece is ready.
HTTP/3 is a new protocol, developed by Cloudflare in conjunction with major browsers such as Chrome and Mozilla, that offers further performance improvements.
These days, most major hosting providers provide their customers access to HTTP/3 (you can check your site here).
How to do it
In general, your host or CDN should already support HTTP/3. If, when testing, you discover this isn’t the case, contact your hosting provider for more information.
In the rare case your site isn’t on HTTP/3, you can move to one of the many major hosts that do offer this.
5. Enable TLS 1.3 for faster “handshakes”
Difficulty: Intermediate (change to server config)
Some websites still make use of the early versions of TLS (the protocol that powers HTTPS), but the later versions of TLS have much better handshake performance.
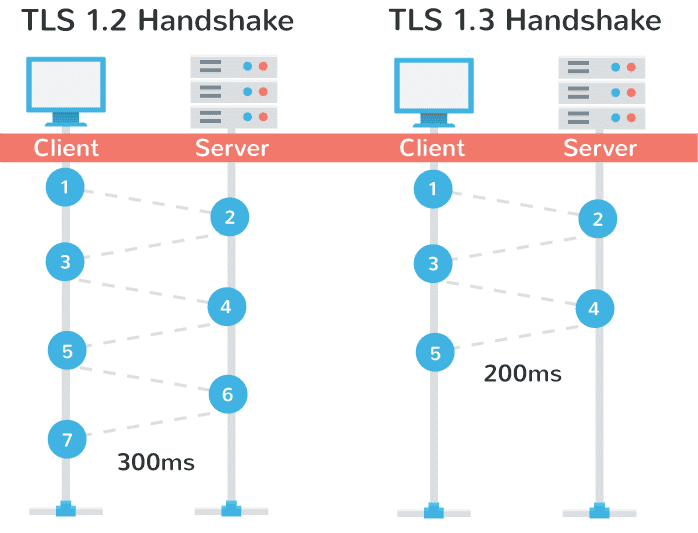
By enabling TLS 1.3, you could shave 100ms off your load time.
How to do it
Check your server config to see which versions of TLS are currently supported.
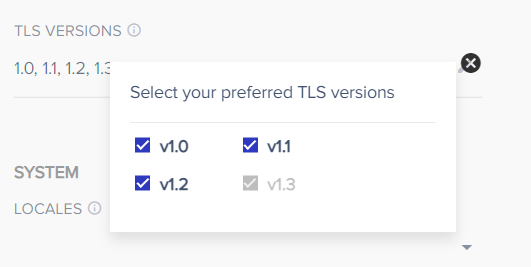
You can also test your site here.
In most cases, your site should already be using TLS 1.3. If not, you can usually toggle it on in the settings. If this isn’t the case, however, reach out to your hosting provider.
Further reading: An Overview of TLS 1.3 – Faster and More Secure (Kinsta)
6. Enable caching at the PHP level
Difficulty: Intermediate (requires tweaking your php.ini file)
Why should you do it?
PHP is an interpreted programming language. Which means each line of code that runs is “translated” to machine-level instructions every time that line is executed.
Most PHP sites are typically running the same few thousand lines of code over and over again.
And because the same lines of code need to be repeatedly translated, there is a significant amount of unnecessary work.
OpCode caching is a way to solve this problem.
What happens here is that the translated lines of code (called opcodes) are saved to server memory.
And when the same line of code needs to be executed, the translated line is fetched straight from memory.
This improves performance significantly.

How to do it
To enable OpCode caching, you’ll need to tweak your php.ini file.
This guide from Cloudways explains how to do it and also dives a little deeper into the advantages of enabling OpCode caching.
7. Enable a CDN to serve static content from multiple locations
Difficulty: Intermediate (will involve changing your website’s DNS settings and/or file paths)
Why should you do it?
There is one key aspect when it comes to website speed that you have little control over:
The actual physical distance from the location of the client browser to the website server.
You could (and should) choose to have your server located as physically close as possible to your target audience. But with an international audience, this becomes complex and quite expensive.
Fortunately, there is an easy solution: using a CDN.
A CDN is a network of servers that is physically distributed around the world. Their servers pull images, CSS, JavaScript, and other mostly static, heavy files to their “edge” servers.
When a client’s browser hits your website, all of the static files are served from the CDN server that is physically closest to the user, with only the dynamic content being pulled from your site.
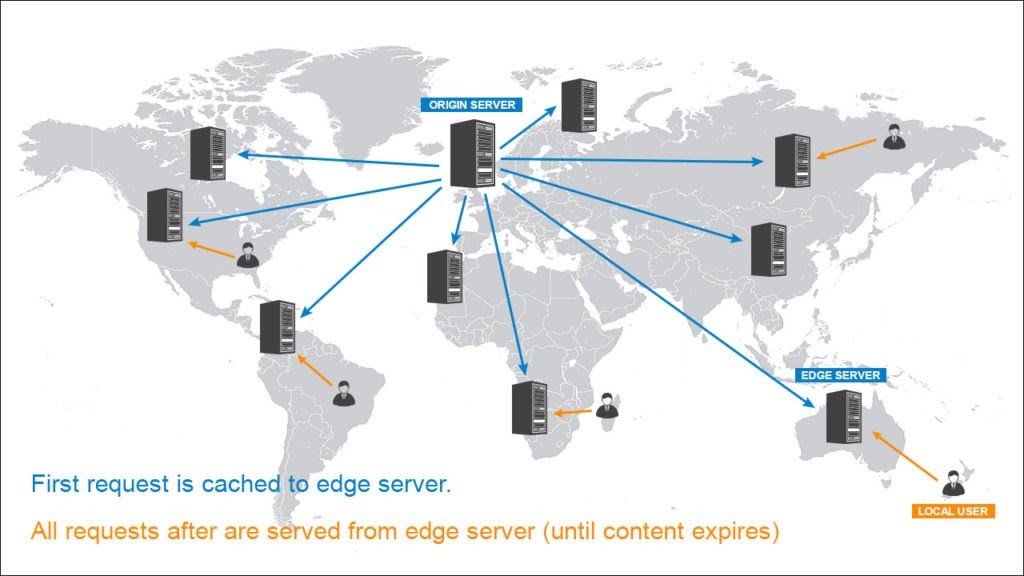
Because static files are usually the largest, the CDN is doing two things:
- The heavy lifting of serving these files
- Serving them from a location that’s closer to the user, greatly improving the performance of your site overall.
How to do it
First, you’ll need to register with a CDN. You’ve got a ton of choices, so check out this Tech Radar post if you want some advice on which one to pick.
Once you’re registered, the setup process is going to vary by provider (most will provide detailed docs), but this guide provides a good general overview.
8. Use cookie-free domains for static files (CSS, scripts, etc)
Difficulty: Easy to intermediate (CDNs will normally do this by default, but you can also set up your own cookie-free subdomain)
Why should you do it?
Browser cookies are typically used to store small pieces of information in the browser. For example, a cookie might temporarily “remember” a user’s credentials, so they don’t have to log in every time they visit a site.
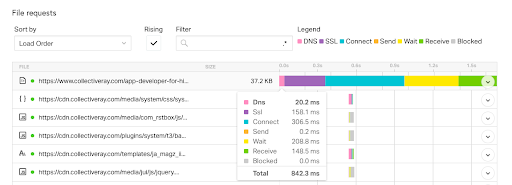
But they get a ride on ALL requests sent by the browser. So in spite of their typically small size, they are creating overhead and adding to page load speed.
How to do it
A CDN usually strips cookies from static files by default.
But you can also tweak WordPress to use cookie-free domains by following these instructions.
9. Upgrade MySQL to MariaDB
Difficulty: Intermediate (generally the switch is straightforward, but be careful and take backups)
Why should you do it?
In a nutshell:
MariaDB is a faster database engine than MySQL. It’s a drop-in replacement, and if you’re currently running MySQL, it’s an easy speed win.
How to do it
Most hosts will have a one-click setting to switch to MariaDB.
But if you want to get your hands dirty, then check out this guide on how to do it manually.
10. Enable Object Caching to store database query results
Difficulty: Advanced (generally easy to do, but requires changes to server config)
Why should you do it?
Object caching (such as Redis) is a method of storing database query results so that they can be retrieved from a cache instead of repeatedly querying the database.
This caching helps improve performance for common or repeated queries that don’t change often. Database resources can then be conserved for queries that are more dynamic in nature.
How to do it
Redis needs to be supported at your server level, so you need to enable it via your VPS setup.
Some hosts will have a setting to enable Redis…
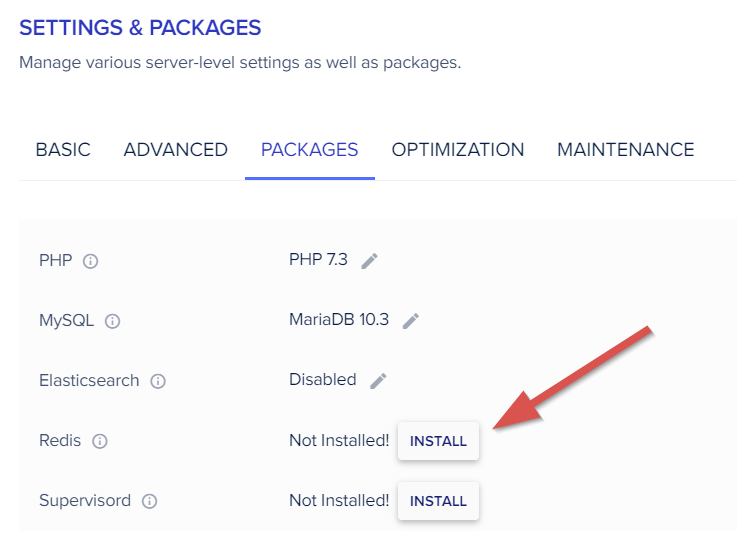
…but if not, here’s how to do it manually on an Ubuntu server.
11. Swap Apache to Litespeed Server or NGINX
Difficulty: Advanced (if you don’t have experience modifying server configs, then you might be best to get someone to handle this for you)
Why should you do it?
Apache continues to be one of the world’s most popular web servers. According to data from w3techs.com, over a quarter of websites currently run on Apache.
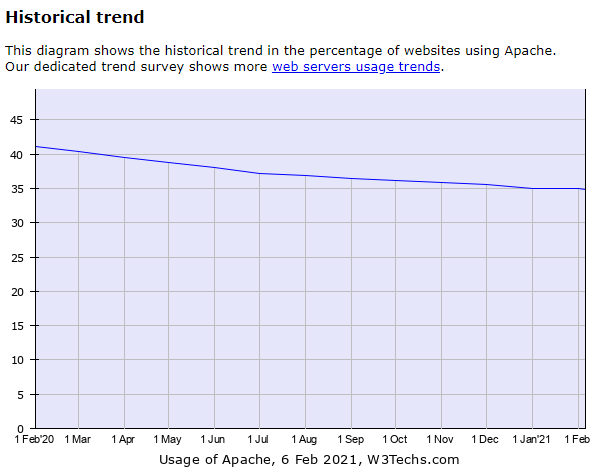
But it’s by no means the fastest.
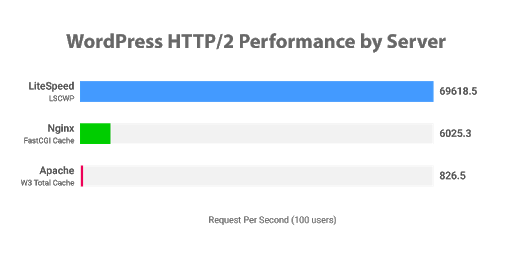
Switching to LiteSpeed or NGINX can bring a significant boost in performance.
How to do it
LiteSpeed is a drop-in replacement for Apache with significantly better performance. And the upgrade path is relatively straightforward, so if you run a VPS, upgrading to LiteSpeed is highly recommended.
Switching to NGINX is not quite as simple and will require more testing and tweaking. Here’s how to do it on an Ubuntu VPS.
12. Remove other websites from the server
Difficulty: Intermediate to advanced (will involve migrating other websites off the server hosting your “main” site)
Why should you do it?
If you’ve switched from shared hosting to a VPS (or upgraded your current VPS) then you should have already seen some solid page speed benefit.
But if you run multiple websites and want to boost your “main” site, then it’s a good idea to have that one running on its own VPS, with its own dedicated resources.
Because while you’re not going to be sharing resources with tens, hundreds, or even thousands of other sites like you would on shared hosting, you’ll still be splitting resources between your own properties.
So it makes sense to give your “main” website its own space to breathe and grow.
How to do it
If you set up a new server with your current host, they should be able to help you move your non-critical sites to the new server.
But if you’re doing it yourself, then refer to our website relaunch guide.
13. Eliminate PHP modules or tasks you don’t need
Difficulty: Advanced (uninstall the wrong module and you could break your site!)
Why should you do it?
PHP has a lot of modules running by default, and (depending on your website functionality) there’s a good chance that you don’t need some of them.
Eliminating the PHP modules that aren’t required by your site can boost speed and performance.
How to do it
These tweaks should be handled with care to make sure you’re not removing any functions you actually use.
If you’re on shared hosting, you can usually use the Select PHP Version tool to do this by following this guide. Alternatively, you can ask your host for help.
If you’re running a WHM setup (i.e., managing multiple cPanel accounts on a VPS or dedicated server), this is a good guide to follow.
Next steps
The steps listed above should form a great foundation for optimizing your website’s load times, but there’s more you need to do.
If you’ve followed along, then most likely, you’re already seeing decent speed improvements.
However, your server and infrastructure are just one side of the coin, with website speed optimization being the other.
Check out our guide on page speed optimization for tips and tricks on how to improve further.
Or, if you’re on WordPress, our guide on WordPress page speed optimization can help you on your way.
And if you would like to try Seobility to measure your server’s response times and check your website for more potential technical SEO issues, you can sign up for a 14-day free trial here.